OpenSea is a decentralized peer-to-peer marketplace to buy, sell and trade non-fungible tokens (NFTs). OpenSea markets itself as the largest NFT marketplace. Therefore, It is worth walking to explore the world of OpenSea and discover what it offers in the trade of NFT.
This article will take you through the questions like what OpenSea is, And what is the user journey in the platform.
What Is OpenSea?
With the surging popularity of CryptoKitties, Devin Finzer and Alex Atallah decided to create a decentralized platform to trade NFT. Hence, in 2018, OpenSea was formed. Since then, OpenSea is witnessing significant growth in the NFT market. Artwork by Beeple for $70 million and flying Pop-Tarts rainbow cat for $600,000 is trading on OpenSea.
The Growth rate of OpenSea is astonishing. OpenSea in March 2021, recorded $82.5 million in transaction volume.
Recently Logan Paul has announced the launch of his first NFT on Twitter, with networth of over $3.5 million. These announcements from influencers are adding fuel to the burning fire.
NFTs acquire huge significance for Digital art. They are non-replicable digital assets which require a unique marketplace for its trade. Thats where OpenSea came into play. But before we take a deep dive into the OpenSea marketplace. If you still have some ambiguity regarding NFTs you may read more on this.
OpenSea, The Largest NFT Marketplace
OpenSea is like an amazon for NFTs. It has millions of unique digital assets. Besides having digital art it has multiple categories of collectibles, games items, music and other digital representations of physical assets.
Setting Up Your wallet
Wallet is a tool to connect with the blockchain, and to store, buy, and sell NFT. One thing to remember here is that OpenSea doesn’t provide the infrastructure to store the assets. So we need to connect with the external wallet. In this case we are using MetaMask.
Trading On OpenSea
Trading on OpenSea is more to rely on smart contracts than the counterparty. You don’t need to trust the buyer or the third party. This is because OpenSea uses the Wyvern protocol. This protocol enables the swap to change the state of NFT ownership as soon as the seller receives the cryptocurrency ownership.
Connecting To OpenSea
After setting up the wallet, now it's time to connect with OpenSea and discover the world of it. To do so, click on the top right corner, then my profile, select MetaMask, sign in and follow the instructions in your wallet.
Creating Collections
Your page is empty for now. To create one, you can click on create, fill the description and hit Add. You can now see your collections at the window.
Searching For NFTs On OpenSea
The marketplace option is the heart of OpenSea. You can search for any NFT by typing name or can use various filter options.
Creating NFTs
To create your first NFT, click on the Add new Item. A new window will be open. You can add your metadata such as images/audio/video files with the NFT name below. You can also add external links and descriptions of the NFT.
This method can create only one NFT at a time. However, if you want to make multiple versions of the same artwork you can add the Edition numbers in the stats below.
You can also add unlockable content such as high-resolution files and private keys of Physical assets to ensure security. Once you are satisfied, you click on create and a new window of your NFT statistics will be open.
Buying NFTs On OpenSea
To buy NFT you first need to buy ETHs. Users also need to ensure that they accommodate gas cost by themselves.
Once you have finished purchasing ETH, bid on the NFT you intend to buy. You can also follow the auction. If you are the highest bidder in the auction you’ll get the NFT.
OpenSea Fee
OpenSea claims to charge the lowest fee in the NFT space. They take 2.5% of the sales price. There are no service charges for buyers. You can learn more about their gas fee structure from here .
The Future Of NFT
The NFT market is growing vigorously and it can only be limited by imagination.There is no doubt that the NFT markets such as OpenSea and Rarible are poised to prosper in future.
Recently, AIRNFTs build on Binance smart chain has also launched. Apart from that Aleph.im has also announced a partnership with the polygon to offer an unstoppable storage solution for NFTs marketplace.
So you probably already know about IPFS(Interplanetary File system) and how awesome it is. But, if not, it’s a peer-to-peer distributed file system used to store and access files, websites, applications, etc. The unique thing about it is that your data is not just stored on servers but stored in various computers around the world in various chunks. IPFS seems to be a very interesting concept to learn about, but, a bit scary to actually start using. Despite that, using IPFS is very simple. Anyone who even has slight know-how of the command line can use it. So here we will be implementing IPFS first in the command line and then using the JavaScript package ipfs-core.
IPFS Command Line
Installation:
For this tutorial, we will be implementing IPFS using Ubuntu.
To implement IPFS on the command line you need go-ipfs. You can either download go-ipfs Or you can just execute the following command in your terminal.
At the time of writing this, the latest version is 0.7.0. If there is a newer version you can download that instead.
After downloading go-ipfs you will have a .gz file, you will need to extract the file. You can do that easily by opening the terminal in the directory where the .gz file is located and execute it using the following command.
$ tar -xvzf go-ipfs_v0.7.0_linux-amd64.tar.gz
This will extract the go-ipfs folder. Now to install IPFS first traverse into the folder.
$ cd go-ipfs
Inside you will find an install.sh file, you just need to execute it using sudo bash.
$ sudobash install.sh
With this, you have installed IPFS successfully. You verify this through the following command.
$ ipfs --version
> ipfs version 0.7.0
After this, you need to do one last thing before you can start using IPFS properly and that is initializing your ipfs repository. IPFS stores all its configuration and internal files in this directory and if you are using it for the first time you will need to initialize that first.
You can do that simply, by using
$ ipfs init
With this, your repository has been initialized and the Merkle-DAG hash of your repository has also been generated. In case you are wondering what a Merkle-DAG is, it stands for Merkle Direct Acyclic Graph. DAG is a graph consisting of various nodes connected to each other with direction and Merkle-DAG is the root hash of all the nodes. Since IPFS breaks our files into different chunks, it uses DAG as a manner of storing the file in a secured way such that retrieving it would be easily possible.
You can use this generated hash to view the contents of the ipfs readme file and quickstart file present in the directory. You can read them using the "ipfs cat" command.
You have now successfully installed and set up ipfs in your command line. Now you are ready to store and retrieve files from the IPFS network.
Adding and Reading Files:
Now let's begin using IPFS by creating a Hello_World.txt file, adding it to the network, and reading its content. You can upload files to IPFS by using the "ipfs add" command. Execute the following lines.
$ echo “Hello World” >Hello.txt
$ ipfs add Hello.txt
You have now successfully uploaded your Hello.txt file to the IPFS network and have been given a unique Merkle-DAG of your file which you can use to access data and give it to your friends so they too can get your file. You can read your file using the "ipfs cat" command
$ ipfs cat <your Merkle DAG>
This outputs the content of the file which in this case is “Hello World”. Similarly, go to a different directory and execute
$ ipfs get <your Merkle DAG>
The "ipfs get" command can retrieve any file from the IPFS, given it is available. You now have the Hello_World file having its name as the MerkDAG of the file.
Now let’s try something, here is the hash to my desktop wallpaper QmYA2fn8cMbVWo4v95RwcwJVyQsNtnEwHerfWR8UNtEwoE
Try retrieving it using"ipfs get", you would probably be getting the following message.
So far what we have been doing is just creating our files and notifying our ipfs client where to find our file. For us, that is simple since the file in question is located on our local storage, hence, fetching that is easy. However, for other users that won’t be possible since we haven't connected our client to the IPFS network and notified everyone where our files are located. The same applies to us, the reason we can't find this file is that we are not connected to the ipfs network and our ipfs can only search our local storage where the file is not available. To connect to the ipfs network we need to start a daemon process which we can do with the following command.
$ ipfs daemon
You will see the following messages.
Once its daemon is ready let's try fetching the file which I was trying to share.
$ ipfs get QmYA2fn8cMbVWo4v95RwcwJVyQsNtnEwHerfWR8UNtEwoE
This may take some time depending upon your geographical distance from the hosted file, but eventually, you will be able to get the file. As mentioned above it is my desktop's wallpaper so feel free to use it as you wish.
That concludes our tutorial on the basic usage of IPFS for adding and fetching files using the command line. You can simply enter "ipfs"on the command line to view all its commands with descriptions. Now let’s try to do the same with the IPFS JS package ‘ipfs-core’.
IPFS-JS Library:
If you are a developer you will most probably prefer doing all the above tasks through your javascript code rather than the command line. So for that, we have npm package called "ipfs-core". You can install that using the following command.
$ npm install ipfs-core
This package requires a node version of 12.0.0 or higher. If you attempt to use it with an older version you will be able to install it but while using it, errors may occur.
Let’s start by connecting to the ipfs network. First, create an ipfs instance for us to interact with and get its version.
This will simply create a file named Hello_World.txt with Hello in its content.
However, this way we can only insert text files to the IPFS, what if you want to upload an image or a video? For that, we need some help from the js package ‘fs’.
const IPFS = require('ipfs-core')
const fs = require('fs')

async function main(){
 const ipfs = await IPFS.create()

 fs.readFile('<Your File Path>', async function(err, data) {
   console.log(data)

   const fileAdded = await ipfs.add({
     path: '<path of the file you want on the IPFS>',
     content: data
   })

 console.log('Added file:', fileAdded.path)
});
}
You can always view the files you are uploading using their Merkle-DAG in the "ipfs get" command or you can also view by visiting the ipfs.io.
You can also do that by using ‘ipfs-core’. The following code gets the content from our uploaded file.
const IPFS = require('ipfs-core')

async function main(){
const ipfs = await IPFS.create()


 const chunks = []
 for await (const chunk of ipfs.cat('QmVZdicceMroeHLYiVvCc2CkPzrR5uoHF4Ks9uFhSyhX8z/Hello_World.txt')) {
     chunks.push(chunk)
 }

 console.log('file contents:', chunks.join())
}
And that concludes our tutorial for implementing IPFS using the JS library.
Conclusion:
And so with that, we have covered how to add, view, and retrieve files using IPFS. As a basic user, this is all that you need but there are deeper concepts in IPFS worth exploring such as Pinning, IPNS, and IPFS Buckets. We shall explore these concepts in detail in the future where I will make part 2 explaining how to make IPFS buckets.
Xord is a Blockchain development company providing Blockchain solutions to your business processes. Connect with us for your projects and free Blockchain consultation at https://https://blockapexlabs.com/contact
The Graph Network [Part - II] - Deploying the Subgraph
In this part, we’ll be looking at how to deploy a subgraph and how to query it.
However we won’t be creating our own node, we will be using the hosting service provided by The Graph.
Using Hosting Service Of The Graph:
Before we create a subgraph, we need a place for it to exist on, in our case we are using the hosting service of The Graph network.
Create Account:
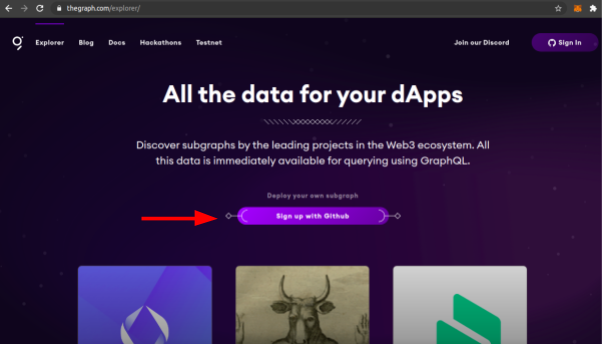
In order to do that the first important thing is having an account on graph explorer.
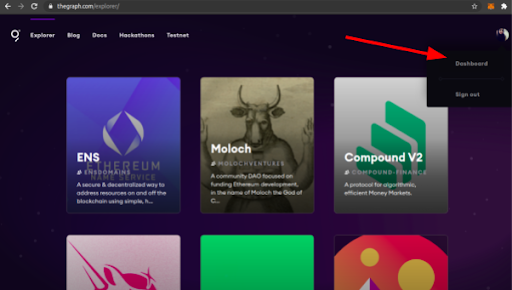
Just sign in to your GitHub account and click sign up with Github.
After you sign up, go to the dashboard.
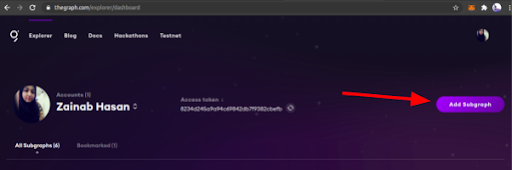
Add a subgraph:
To add a subgraph, click on the add subgraph button.
You will be prompted to a page like the following snippet.
I’ll explain the relevant fields only.
Subgraph Name: This is the name of the subgraph, once named, you can't change it.
Account: As you probably know the Github can have a personal account or organizational accounts, you can toggle between those here.
Subtitle: Just add little information regarding the subgraph. This field is necessary,
Then click create subgraph.
This way we have an end-point to create the subgraph on.
Now you are all set up on The Graph Networks side, we will now move to our system’s terminal and proceed with deploying the subgraph from there.
Deploying the Subgraph:
From here on all commands are to be entered in your system terminal.
Installing The Graph cli
On your system, install the cli globally using either yarn or npm
$ npm install -g @graphprotocol/graph-cli
$ yarn global add @graphprotocol/graph-cli
There are instances when installation from yarn globally doesn't work.
Just use
$ export PATH="$(yarn global bin):$PATH"
Initiating the Graph
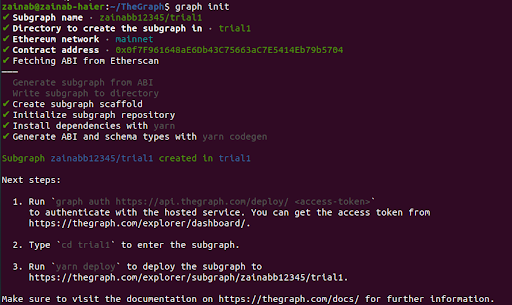
To create the graph, run the following command
$ graph init
Then the console will prompt for information.
Subgraph Name: This is the name of the subgraph.should be identical to the one entered on the dashboard preceding your GitHub username.
Directory to create the subgraph in: This is the directory name.
Ethereum network: The Graph network supports multiple ethereum networks such as mainnet, kovan, rinkeby, ropsten, goerli, and poa-core. In this field just choose the one your contract is on.
Contract Address: Enter your contract address here. I used a dummy address
After you enter the relevant data, the cli will fetch the ABI from etherscan, You can enter the local path of ABI as well.
The end result will be as follows:
Understanding the file structure:
Once the subgraph is initiated, default files will show up in your directory.
It consists of:
Schema.graphQL: Define the entities and their attributes in this file.
Subgraph.yaml: This file consists of all the information regarding your project, like network, contract address, start block, event handlers, call handlers, block handlers, and data sources.
src/mapping.ts: In this file, you create the logic for event handling, block handling, and call handling.
After you edit the schema and subgraph.yaml file, use the command
$ yarn codegen
This command will generate or update the auto-generated files
Then make relevant changes to the mapping file.
To save those changes run
$ yarn build
Deploying the Subgraph:
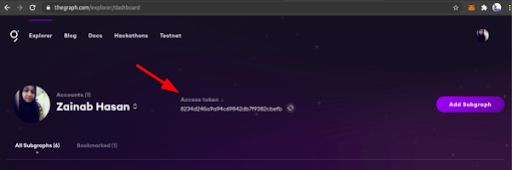
To deploy the subgraph first we need to authenticate with the hosted service. To do that copy the access token from the dashboard.
Go inside your subgraph directory by simply running
$ cd <directory name>
Then a simple command will deploy the subgraph
$ yarn deploy
Keeping track of progress:
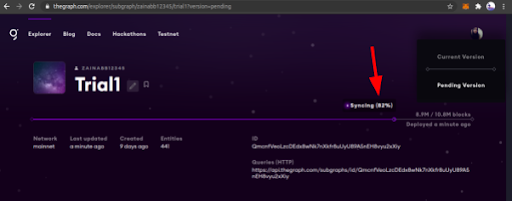
Once a subgraph is deployed, the graph node will sync, the progress can be tracked via the dashboard.
This syncing starts from the genesis block however it is a more practical approach to give start block property, in this way the subgraph will start syncing from the starting block to the recently mined blocks.
Redeploying the subgraph:
If you make a change in the subgraph files, you can redeploy it on the same endpoint by using the same command of:
$ yarn deploy
Subgraph Versions:
When a subgraph is deployed for the first time, it has no version, however, when subgraphs are updated they exist in two states. The current version holds the initial state of the subgraph. While the updating / syncing version falls under the pending version category.
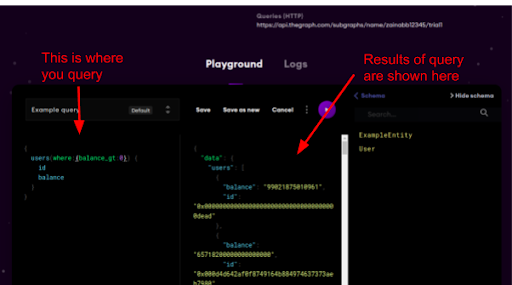
Querying the Subgraph:
GraphQL is used to query the subgraph.
You can query any subgraph you own, or the subgraphs lying on the explorer. You can even query the subgraphs which aren’t on explorer, all you need is the Query link.
In the above snippet, a simple query to fetch all balances and their id where balance is greater than 0 is taking place. The results can be seen as well. In the schema column, lies the entities present in your schema.
In cli installation, I mentioned that you can install it using either yarn or npm. But The Graph installs dependency using yarn, which is why, even if you install the package using npm, to deploy and build subgraph you still have to use the yarn package.
Conclusion:
This article covers all you need to know about deploying the subgraph. Now you can create and deploy subgraphs on any contract of your liking.
Uniswap, Airswap, Opium Network, Sabier, and many other services hosted their subgraphs on The Graphs hosting service as well.
Xord will help you integrate your business processes with Blockchain technology. Follow the link to connect with us: https://blockapexlabs.com/contact/
Deep Dive into Azure Blockchain for Enterprise Blockchain Solutions [Part 3]
This is the last part of the Azure Blockchain for Enterprise Blockchain Solution series. In the first two parts, we learned about consortium networks and smart contracts deployment on Azure Blockchain. In this part, we will particularly explore Azure Blockchain Our Workbench and its power to make Blockchain enterprise-friendly. As explained in the previous series, Azure Blockchain Our Workbench lubricates the development process of Blockchain applications by integration with various Azure services. It leverages the Blockchain by easing the process of sharing data and processes among organizations. Following are some major features of Azure Blockchain Our Workbench:
1. Identity Management
Azure Active Directory manages the identity of the members of the Blockchain network by mapping real and simple identities e.g emails with the complex addresses of Blockchain. Also, Azure Blockchain Our Workbench provides you with the flexibility to invite other members to the consortium network by simple invites on emails. Keys are managed and stored in Azure Key Vault that automatically encrypts transactions on behalf of the members without exposing the keys to Microsoft or any other third-party.
2. User Roles Management
The administrator can manage the roles of members in a consortium network who possess the permission to create smart contracts in the network.
3. Off-Chain Storage
Provides the flexibility to stores the on-chain data off-chain as well in relational databases for data analysis
4. API Management
It provides easy integration with other applications by enabling the use of APIs for accessing Blockchain services.
As now you have got a basic understanding of what Azure Blockchain Our Workbench is, let's get straight into the fun part and deploy Our Workbench in your Azure Portal to explore things in action.
Deploy Azure Blockchain Our Workbench:
In your Azure Portal navigate to create a resource → Blockchain → Azure Blockchain Our Workbench.
Basics:
Choose a unique identifier for your deployment in Resource prefix.
Now, choose your VM username.
Choose the Authentication type as a password and set your password for connecting to VM.
Set a password for accessing the database that is created as part of the deployment.
Choose your deployment region, subscription, resource group and location accordingly.
Sample Deployment:
Advanced Settings:
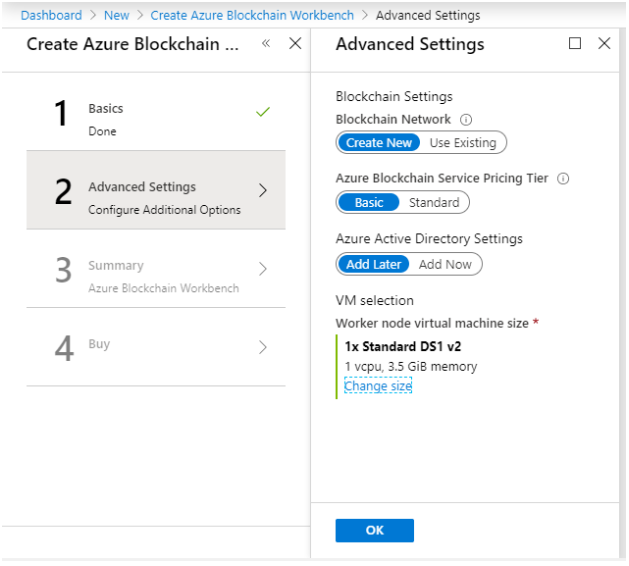
Choose the option of creating a new Blockchain network. It will set up a network of PoA Ethereum nodes managed by a single subscriber. If you want to use an existing Ethereum proof-of-authority network, you need to add the RPC endpoint URL here.
Choose Azure Blockchain Service Pricing Tier.
We are going to set up Azure Active Directory settings later, so choose the Add later option.
Choose DS1 v2 for VM as we are doing it for learning purposes
Sample Deployment:
View the summary and complete your deployment. Your deployment may take up to 90 minutes.
Post Deployment:
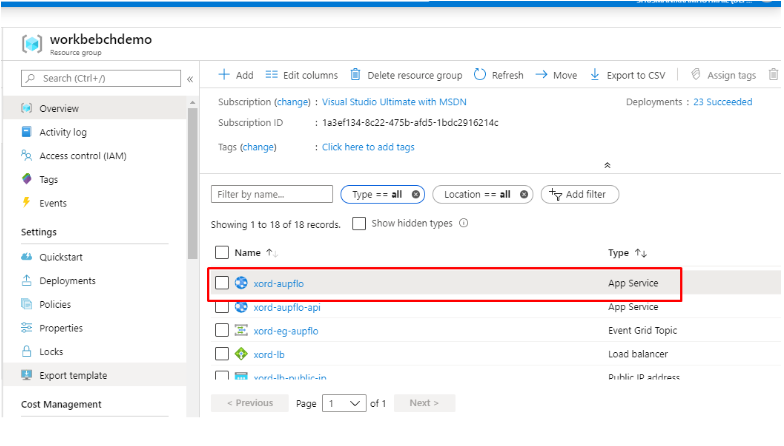
After your deployment is completed, navigate to the resource groups and choose the resource group in which you have deployed the Azure Blockchain Our Workbench. In the OverView tab, under the Type Filter column, only check the ‘App Service’. There are two deployments in total with type App Service. Choose the one that is without API.
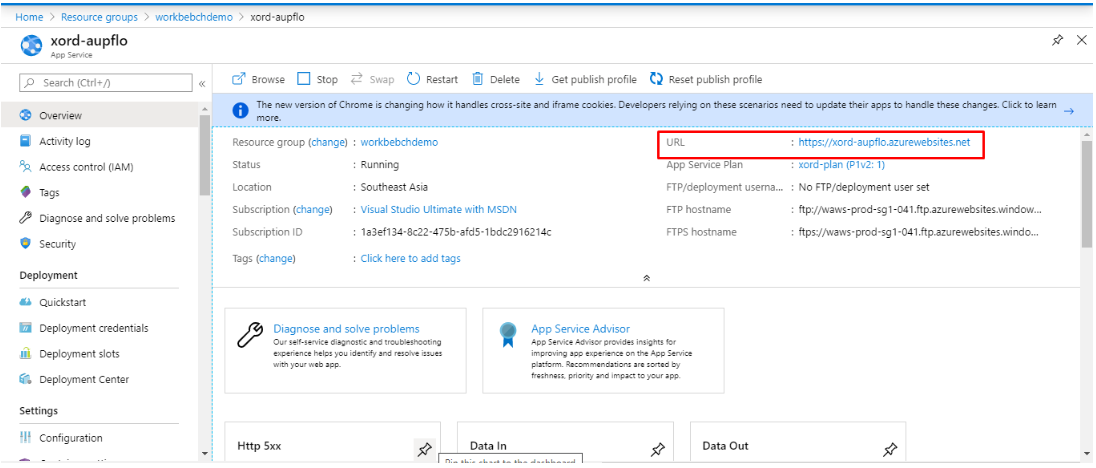
In its OverView tab in the top right corner, you’ll find the URL for your Azure Blockchain Our Workbench. Copy it and paste it in the browser.
After that, you’ll be headed to a welcome page of Our Workbench asking you to do some additional setups. These steps are important to set up the Azure Active Directory as we had chosen the ‘Add Later’ option during the Azure Blockchain Our Workbench deployment.
Azure Active Directory Tenant Setup:
Azure Active Directory basically allows you to manage users and roles associated with your resources in Azure. Here we need to give users access to create applications in Azure Blockchain Our Workbench. So let's see how we can do that.
Step 1: Launch Cloud Shell
Copy the URL you find in the dashboard of Azure Blockchain Our Workbench and choose the option of Launching Cloud Shell.
Step 2: Create an Azure Active Directory Tenant
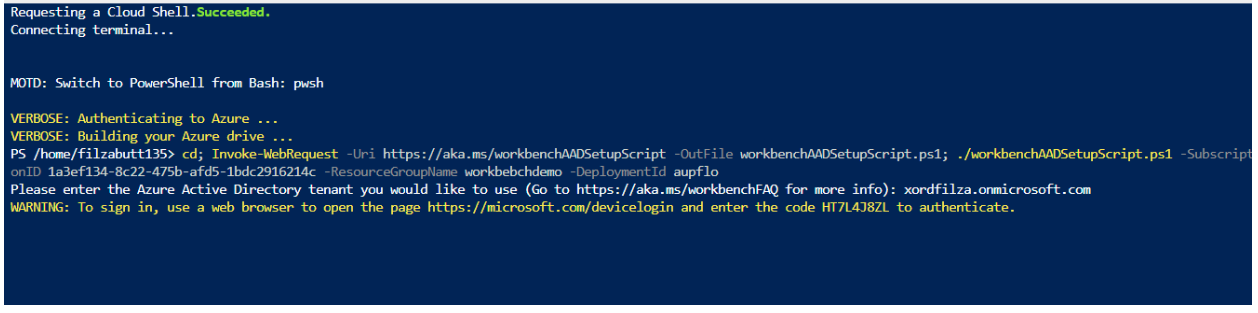
After launching the Cloud Shell, choose your Azure account and then choose the option of PowerShell from PowerShell and bash. This will open a Powershell Command Prompt for you. In this command prompt, paste the URL you copied from your Azure Blockchain Our Workbench dashboard. After entering the URL, it will ask you to enter the link of the Azure Active Directory Tenant. Now to create Azure Active Directory Tenant in Azure follow the following steps:
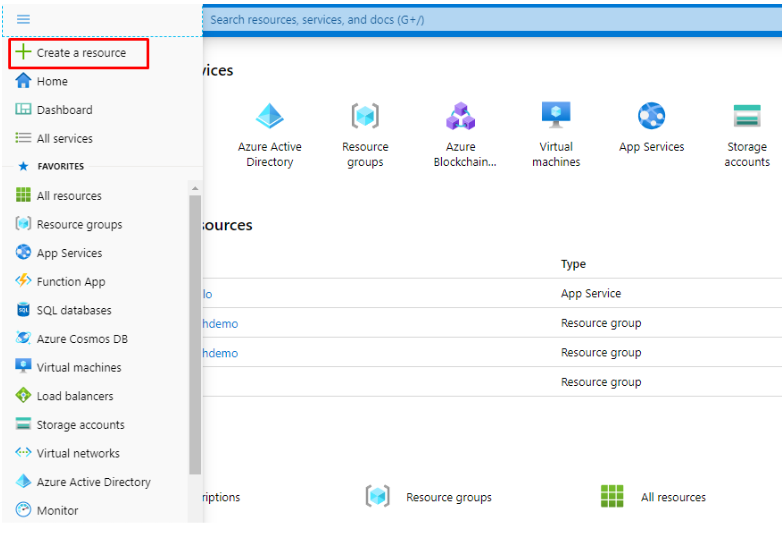
In your Azure Portal Dashboard Menu, click on the created resource and in the marketplace search for Azure Active Directory.
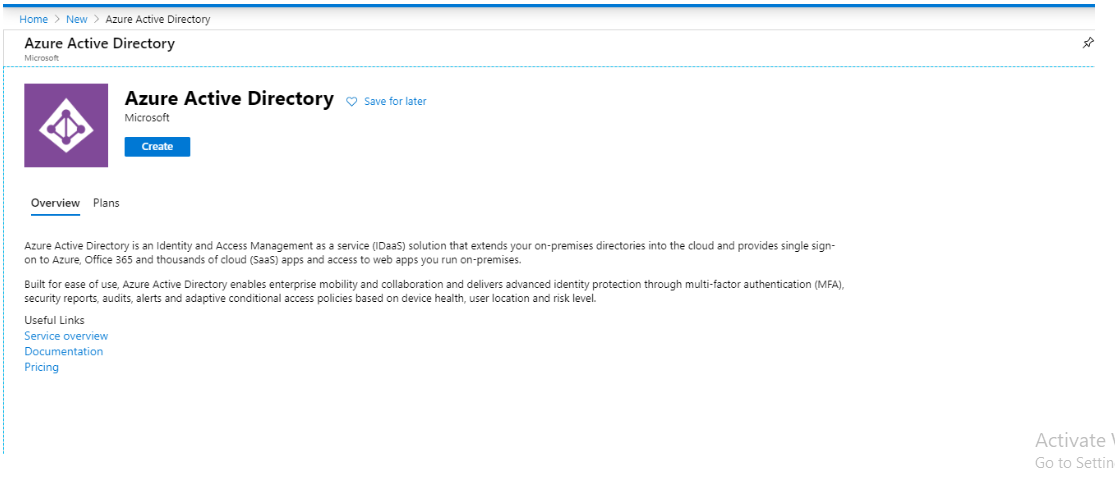
Once you find the Azure Active Directory, click on it and you will get a creative option. Click on the Create button.
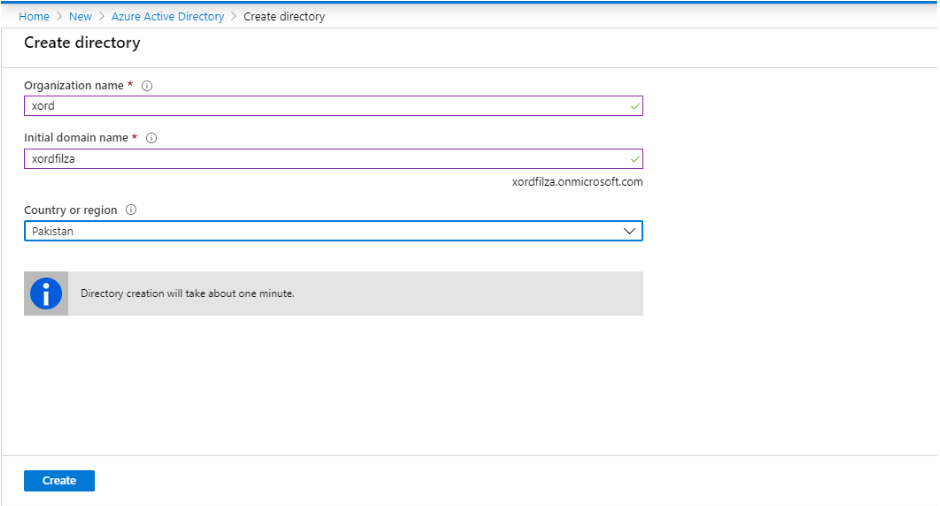
After that, you will see a form to add Organization name, Domain name, and Country. Add the details like follows:
After that click on Create to create the directory. It will take a minute to be completed.
Once the Active Directory is created, copy the initial domain name that you have entered, that in my case is ‘xordfilza.onmicrosoft.com’, and paste this domain name in the opened window of Cloud Shell where it was asking to enter the Azure Active Directory Tenant.
Step 3: Enter The Code
Navigate to the output URL and paste the code that is output on the PowerShell window after entering your Azure Active Directory Tenant Name.
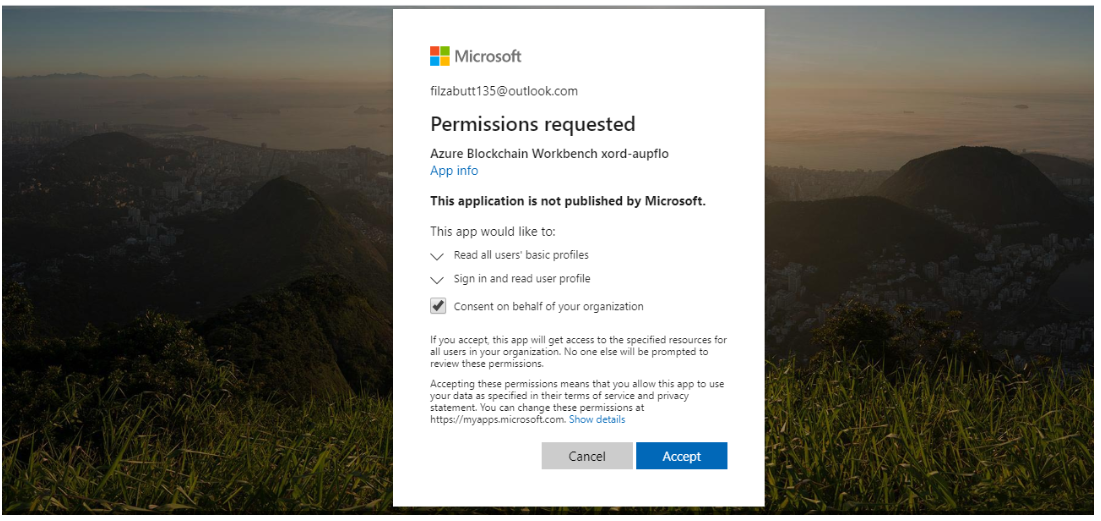
Step 4: Grant Permission
After entering the code, you’ll see the success message in your PowerShell after several messages. Now refresh your Azure Blockchain Our Workbench URL, you’ll be asked to grant permissions. Check the box of ‘’consent on behalf of your organization’’ here.
After that, your Azure Blockchain Our Workbench will be refreshed and you can use it to create new applications in the Our Workbench. You can also add a user to your Our Workbench and giving them access to create and interact with your application.
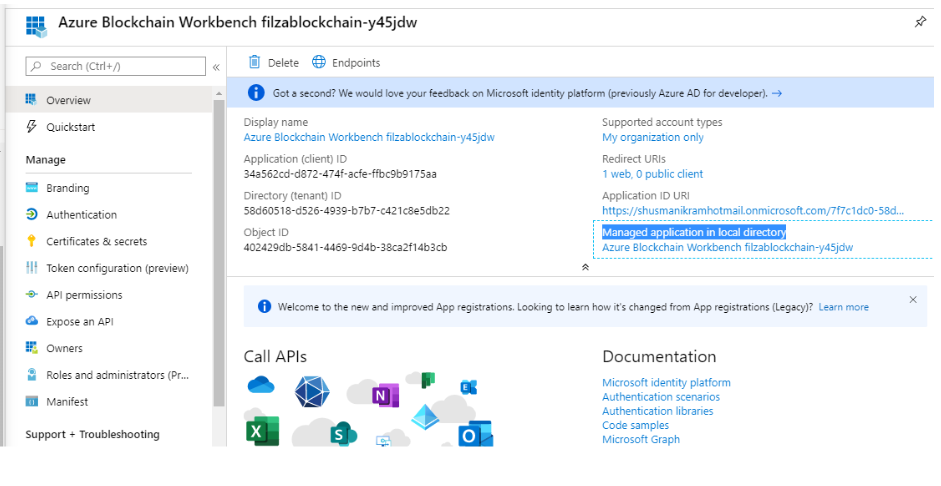
To add users go to Azure Active Directory → App Registrations.
Here you will find your Blockchain Our Workbench application. Click on that and go to the link under “Managed application in local directory”
Clicking on that link will take you to the dashboard where you can assign users and groups and manage them accordingly.
Conclusion:
That’s all for the final part of this series for building enterprise Blockchain solutions. The goal of the series was to give the readers an idea and overview of the different notable Blockchain services in Azure and the basics of their deployment. There is yet too much to explore individually in each of these services so you could choose the best service fit depending upon your enterprise needs.
Writing Your First Smart Contract Using Clarity [Part 1]
Introduction:
Blockstack is a platform with a vision of building a decentralized internet. Users are in control of their identity and data. It is a revolutionary shift in how people could use the software, create it and can get benefit from the internet. It puts people back in control.
As we know in today’s world, the need for a smart contract over Blockchain has become a necessity, so Blockstack came up with their own language and architecture to implement smart contract over Stacks Blockchain.
They have introduced Clarity, through which we can write smart contracts to control digital assets over Stacks Blockchain. Digital assets include BNS names, Stacks Token and so forth.
What Is Clarity:
Clarity is different from other smart contract languages mainly in two ways:
It is not intended to be compiled
It is not Turing complete
The reason that Clarity is not intended to be compiled is to avoid compilation level bugs. Turing incompleteness makes it prone to smart contracts issues such as reentrancy attacks, halting, and transaction fees prediction.
Because of these differences, it allows the static analysis of programs which can be helpful to determine runtime cost and data usage over the Blockchain.
The architecture of Clarity smart contract consists of two parts; a data-space and set of functions. A smart contract may only modify data-space to which it is associated. All the functions are private unless they are defined public.
Users can call a smart contract’s public function by broadcasting transactions on the Blockchain.
Just like Solidity and other smart contract languages, a contract can call public and read-only functions of another smart contract as well.
Basic Architecture Of Clarity:
Basic building blocks of Clarity are atoms and list. An atom is basically a number of strings or characters. For example:
Token-amount
324314
SP2HRJRFVK7MSDJ3T1RWG8385FKRJEWR59BPS014
Native functions, user-defined functions, values, and variables that are in the program can be an atom. In Clarity, if a function mutates data it is terminated with an ! exclamation point. For example: change-name!
The sequence of atoms enclosed with ( ) parenthesis is a List. A list can also contain other lists. For example:
[code language="javascript"]
(get-block info time 18)
(and ‘false ‘true)
(is-none? (get id (fetch-entry names-map (tuple (name \”clarity\”)))))
[/code]
Clarity supports comments using ;; (double semicolons). Inline and standalone comments are supported.
[code language="javascript"]
;; Transfers tokens to a specified principal (principal is equivalent to Stacks address)
The Clarity smart contract has the following limitations:
The atomic types only include booleans, integers, fix length buffers (includes string and bytes) and principals
Recursion is illegal
Lambda functions are not supported
Looping can be performed through ‘map’, ‘filter’ or ‘fold’
Variables are created by ‘let’, binding and mutating functions like ‘set’ are not supported
Atomic types lists are supported. List operations like ‘append’ or ‘join’ are not supported
Let's Write Or First Smart Contract Now!
As clarity will go live in the next Stacks Blockchain fork, you can run Clarity on a local virtual test environment. The environment can be run in a Docker container. Before you begin this tutorial, make sure you have Docker installed on your workstation.
Now, for our first smart contract, we will be writing a simple contract which takes an integer as an input and returns that same integer as an output.
Task 1: Setting up the test environment:
Pull the Blockstack core ‘clarity-developer-preview’ image from Docker Hub.
2. Start the Blockstack Core test environment with a bash shell.
$ docker run -it -v $HOME/blockstack-dev-data:/data blockstack/blockstack-core:clarity-developer-preview bash
The command launches a container with the Clarity test environment and opens a bash shell into the container. The -v flag creates a local $HOME/blockstack-dev-data directory in your workstation and mounts it at the /data directory inside the container. The shell opens into the src/blockstack-core directory. This directory contains the source for a core and includes Clarity contract samples you can run.
3. Make sure you have ‘nano’ and ‘sqlite3’ packages installed inside the container by running commands nano and sqlite3. If packages are not present you can easily install them using these commands.
$ apt-get update
$ apt-get install nano
$ apt-get install sqlite3 libsqlite3-dev
Task 2: Writing the contract:
As you navigate to the path /src/blockstack-core and use ls to view the directories, you will see ‘sample_programs’ directory. This directory contains two sample contracts. We will write our contract in this directory. Let’s write!
Make a .clar file using touch int_return.clar
Copy and paste this contract code into that file using nano int_return.clar
5. Launch the int_return contract and assign it to your DEMO_ADDRESS address. You use the launch command to instantiate a contract on the Stacks Blockchain.
To sum up, you have deployed your first smart contract on the Stacks Blockchain using Clarity and clarity-cli on your local test environment. So, kudos to you! You can now view the transactions and block data from the database using ‘sqlite3’ cli.
Xord can help you build Blockchain projects and give you free Blockchain consultation, connect with us and get started now! Link: https://https://blockapexlabs.com/contact/
Deep Dive into Azure Blockchain for Enterprise Blockchain Solutions [Part 2]
The essence of building Azure Blockchain-based solutions is a 3-Step simple approach for leveraging Blockchain for businesses with easy integration of components. Azure Blockchain facilitates to automate most of the part for developers, hence assisting the developers to directly focus on building their Blockchain application logic. Here is the 3-Step approach that is crucial to Blockchain development with Azure:
Choose the Underlying Network:
Building the foundation of your Blockchain network by choosing a consortium network. Azure Blockchain Service provides you with the flexibility to deploy pre-configured templates of consortium networks. Azure Blockchain provides support for almost every popular consortium network including Hyperledger Fabric, Corda, Ethereum PoA, Quorum etc.
Model Smart Contracts
Once you choose a network, you need to build your Blockchain application logic on the top of that. For that very purpose, Azure Blockchain provides you with Azure Blockchain Development Kit for Visual Studio Code. Azure Blockchain Development kit assists the testing of smart contracts and deployment of smart contracts on Azure Blockchain networks, public networks like Ethereum or even locally deploying the smart contracts on Ganache.
Extending Your Application
After setting your Blockchain network and modelling the smart contracts you need an additional layer to interact with these smart contracts and writing or reading data from the ledger. Azure Blockchain Our Workbench accelerates the development process by providing support for extending your Blockchain application. It also provides the flexibility to integrate your Blockchain application with the existing apps and databases that your business uses already.
In Part 1 of Azure Blockchain for Enterprise Blockchain solutions series, we had exercised Step 1 of this three-step approach and launched an Ethereum Proof-of-Authority (PoA) network on Azure. Now, in the second part of the series, we will further learn about writing and deploying a simple smart contract on the Ethereum PoA network that we had deployed in Part 1.
In this article we will look at the following two methods for deploying your smart contracts on Ethereum PoA network:
If you want to deploy the smart contract for learning and testing purposes, it’s preferred to go with the first method that is using Remix (a browser IDE for compiling, testing and deploying smart contracts). However, if you are developing a product with Azure Ethereum PoA, it is advisable to go with the second method as Truffle provides you with a fine structure for managing the different components of your Blockchain application.
In this tutorial, we are going to explore both the methods with a very simple test smart contract deployment on Ethereum PoA. So let's get started with the fun part.
Method 1 of 2: Using Remix for deploying smart contracts to Azure Ethereum PoA
There are no prerequisites for this method except the Metamask extension that you must already have installed if you have followed the first part of this Azure Blockchain series.
Step 1: Writing Smart Contract
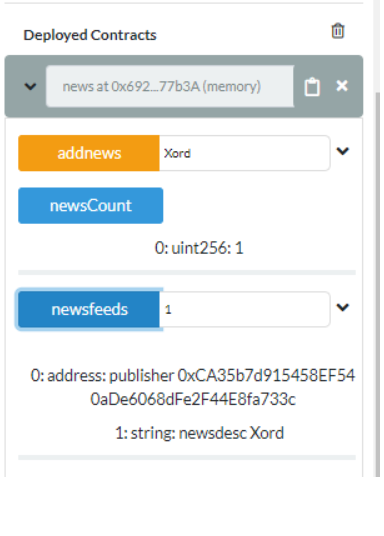
Navigate to https://remix.ethereum.org and click on the (+) button at the top left to add a new smart contract. Name the smart contract as “news.sol”. Now copy the following smart contract in your “news.sol” file:
function addNews(string memory _newsDesc) public { newsCount++; newsFeeds[newsCount].publisher = msg.sender; newsFeeds[newsCount].newsDesc = _newsdesc;
} } [/code]
This is a very simple contract I have written for testing purposes. The mapping in solidity is like an associative array that maps the integer index with newsfeed structure here. Every time you add a piece of new news that is a simple string, the newscount is incremented, that is used as an index to access and store data in the newsfeed structure. Msg.sender in solidity denotes the Ethereum address of the caller of the contract.
So now as you have written your smart contract, navigate to the solidity compiler in the left pane in Remix and compile your contract.
Your smart contract will hopefully compile without any errors if you’re not at bad luck today.
Step 2: Deploying smart contract on Ethereum PoA
As your smart contract has compiled successfully it is ready to get deployed on the network that in our case is Ethereum Proof-of-Authority Network on Azure. Now in part 1 of this series after deploying the Ethereum PoA we got the deployment outputs containing the field like Ethereum RPC, admin site etc. So now we are going to use the deployment outputs here to deploy our smart contract on the network.
In your Azure Portal navigate to ResourceGroup→ Deployments→ Microsoft-azure-blockchain…→ Outputs and copy the Ethereum RPC endpoint to your keyboard.
Azure Portal navigate to ResourceGroup
RPC in the Blockchain is a data exchange protocol that allows for communication between your browser and your Blockchain network or node.
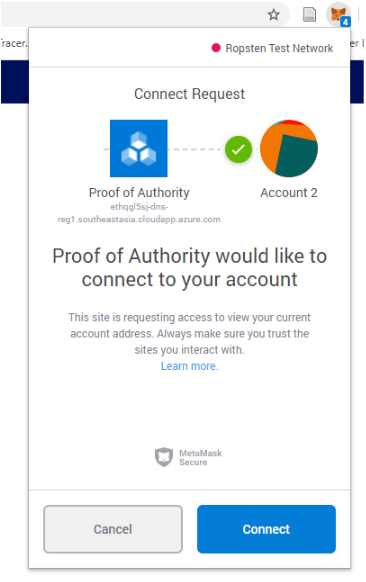
Now let's add this Ethereum RPC endpoint in Metamask so we can deploy the smart contract to Ethereum PoA network from Remix. Open Metamask extension in the browser and navigate to Settings→ Networks→ Add Network and paste the RPC endpoint you just copied into New RPC URL field. Adding into this field will connect your Metamask to Ethereum PoA network.
Once your Ethereum PoA network is connected, navigate to the “Deploy & run transactions” pane in Remix and click on Deploy.
Deploy and run transactions
This will successfully deploy your smart contract on your Ethereum PoA network. You can now view your contract in the Deployed Contracts section of remix and can interact with it by adding into the fields.
Deployed contracts section
Method 2 of step 2: Using Truffle and HD Wallet Provider
In this method, you are going to use truffle for deploying your contracts. You need the following prerequisites for this method:
Truffle Suite: Client-based Ethereum development environment
Any code editor of your choice. However, if you are working with Azure Blockchain I would suggest you go with VS code as it allows you to interact with your network using Azure Blockchain Development that comes handy.
So now let's deploy our smart contract on Ethereum PoA using Truffle step-by-step.
Step 1: Create a Truffle Project
Run your command prompt as an administrator, navigate to the folder in which you want to create the truffle project and type the following command:
Truffle init
This will set a project layout for you in the selected folder like below:
Folder selection
Now let's add our smart contract in the contracts folder. You can use the same smart contract here that we have used in method 1.
Step 2: Adding Migrations
Navigate to the migration folder of your smart contract and create a new file named “2_deploy_contracts.js” for the “news.sol” contract. Paste the following code in this newly created file.
[code language="javascript"] var news = artifacts.require("News");
Now we are going to do the real work of deploying our smart contract on Ethereum PoA on Azure using Truffle.
Truffle gives you a “truffle-config.js” file to add your network settings. We are going to modify this file to add our Ethereum PoA network settings. For that purpose paste the following code in your “truffle-config.js” file:
module.exports = { networks: { development: { host: "localhost", port: 8545, network_id: "*" // Match any network id }, poa: { provider: function() { return new HDWalletProvider(mnemonic, rpc_endpoint) }, network_id: 10101010, gasPrice : 0 } } };
[/code]
In const rpc_endpoint add your PoA network endpoint and in mnemonic add you unique Metamask account phrase. You can find that in Metamask → Security & Privacy → Reveal seed phrase.
Truffle HD wallet provider: For privacy reasons, truffle provides you with HD wallet provider that signs your transactions for you using your private key rather giving access of your private key to any third-party.
Since we are using truffle HD wallet provider in our project, you can install the HD wallet in your project with the following command:
npm install @truffle/hdwallet-provider
Step 4: Deploying your Smart Contract
Now in your command prompt add the following command: truffle migrate --network poa This will start your deployment to your Ethereum PoA network on Azure.
Deploying your smart contract
However, you must use truffle version 5.0.5 to deploy your smart contract on Ethereum PoA. The latest version of truffle points some gas-related errors with Azure deployments. You can downgrade your truffle version with the following command:
As now you have deployed your smart contract to the Ethereum PoA network lets send a transaction to our network. In your project folder create another file with the name “sendtransaction.js” and paste the following code in that file:
[code language="javascript"] var news = artifacts.require("news"); module.exports = function(done) { console.log("Getting the deployed version of the news smart contract")
news.deployed().then(function(instance) {
console.log("Calling add news function for contract ", instance.address);
Now execute this script with the following command in the command prompt:
Deployment on the Ethereum Proof of Authority network on Azure
truffle exec sendtransaction.js --network poa And Hurrah! Your smart contract is successfully deployed on the Ethereum Proof of Authority network on Azure!
That’s all for the part 2 of this Azure Blockchain for Enterprise Blockchain Solutions series. In this part, we have practised the second step of the Azure Blockchain 3 Step approach for building Blockchain applications. In the third and final part of the series, we will learn about building and modelling Blockchain applications with Azure Blockchain Our Workbench. Happy Chaining till then!
Deep Dive into Azure Blockchain for Enterprise Blockchain Solutions [Part 1]
With the emergence of enterprise blockchain, an increasing number of businesses are moving towards the adoption of blockchain for mitigating the problems associated with supply chain, finance, asset tracking and many more. With this increasing interest in business blockchain, one must understand that blockchain isn’t a magical hammer that alone can be harnessed to fix every problem. Blockchain needs the support of other technologies like traditional databases, client-side applications, etc. to provide complete enterprise blockchain-based solutions that are viable in terms of scalability, flexibility and portability. For example, in a supply chain management system, only one or two use cases are aided with blockchain, and the rest of the application is built on other technologies even including traditional databases. That is, in fact, the beauty of enterprise blockchain. Enterprise blockchain solutions sometimes move away from the concept of decentralization but exploit the other features of blockchain in addressing business problems. So one of the major challenges associated with the adoption of blockchain in enterprises is the integration of all these business components together. If you are a blockchain developer you must be aware of the fact that Integrating a blockchain application with the current applications like SaaS, Salesforce, Office, etc isn’t a trivial task and requires added effort. So that’s where Microsoft’s Azure Blockchain creates its space. Microsoft proposes Azure Blockchain to solve the problems associated with the integration of business components and making the overall process seamless and efficient. Microsoft Azure provides built-in infrastructure, tools and services for building a viable, robust, scalable and efficient business solution employing blockchain technology. As now you have got a basic overview of enterprise blockchain, let’s dig down further and explore the tools we have available in Azure Blockchain for building efficient blockchain applications.
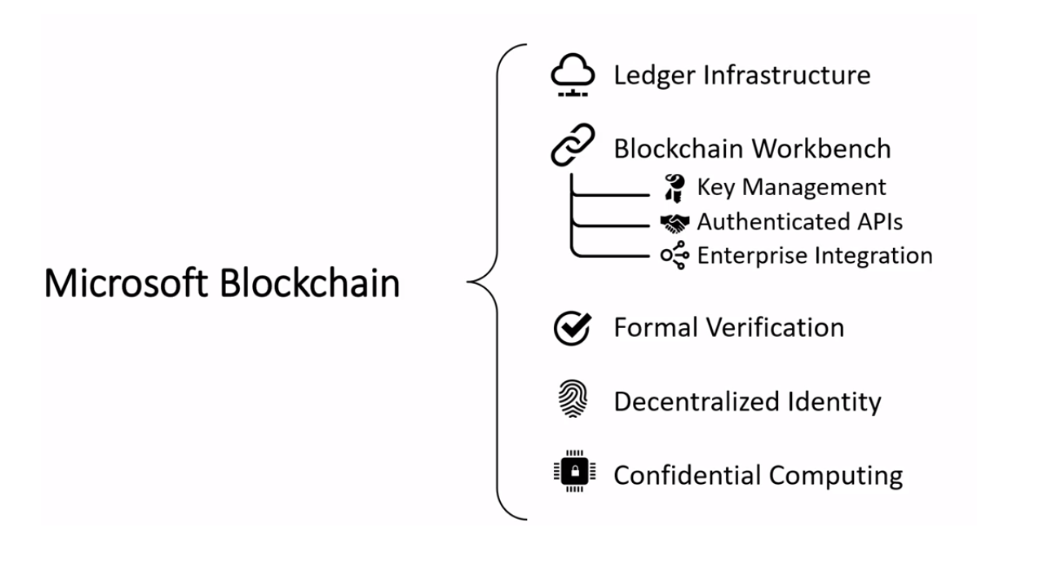
Microsoft Blockchain
Azure Blockchain Service:
Azure blockchain service allows the deployment of the network on Azure with the control of infrastructure management and nodes management on consortium network. Businesses can choose from a variety of popular networks including Ethereum Proof-of-Authority, Corda and Quorum. It also provides the flexibility to introduce your own consortium network into the Azure marketplace on your varying business needs. Azure blockchain services simplify the network management part of the solution, thus facilitating developers to focus directly on the application building part.
Azure Blockchain Our WorkBench
Allows for building applications on a wide variety of blockchain networks in less time and cost by providing pre-built integrations to cloud services, authenticated APIs for REST requests and identity management by linking your identities with Azure Active Directory.
Azure Blockchain Tokens
Allows you to integrate token in your blockchain solution with the pre-built token templates designed by considering the needs of common blockchain solutions. Businesses can also customize the token templates based on their own varying needs. Azure Blockchain Tokens is currently in preview stage.
As now you have got a general idea of what Azure Blockchain is, are you ready to actually see things in action by playing with Azure Portal? Let’s start.
Pre-Requisites:
Azure Account: You can get a free Azure Account with $200 credit for 30 days if you don’t have an Azure account already.
Metamask : If you don’t have Metamask wallet configured already, you can follow the steps in this article to configure and setup your Metamask wallet with fake test ethers.
Getting Started
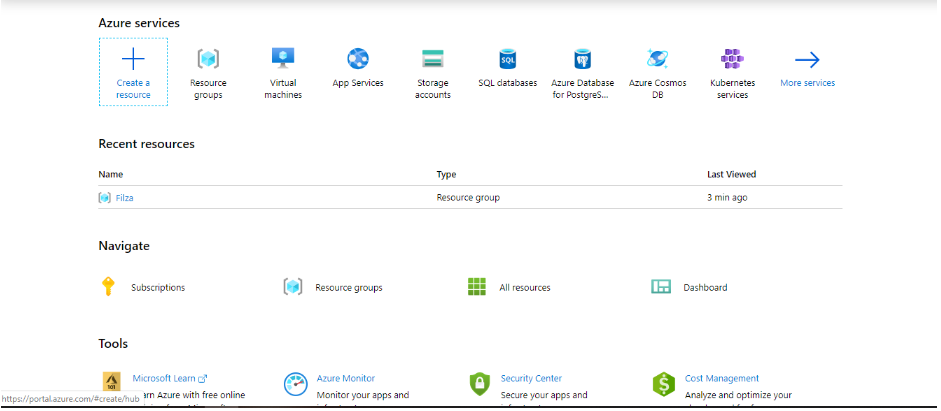
Once you log in to your Azure Portal you’ll see the following Dashboard:
Azure portal dashboard
Before starting with Azure Blockchain services, create a resource group in Azure. Azure Resource groups allow you to store your related logical collections at one place for effective management. You will be using this resource group later in this tutorial. Move to Resource Groups -> Add and choose your Azure subscription, resource group name and your nearest region. After providing all these details click on “Review+Create” to set-up your resource.
Resource group in Azure solution
Now as you have created your resource group let’s explore the blockchain services provided by Azure.
What We are Going To Do
In this part of Azure Blockchain tutorial, we are going to set up a blockchain network on Azure Blockchain first. In Azure Blockchain we can choose from a variety of consortium networks including Quorum, Corda etc. For this tutorial, we are going to set-up a multi-node peer-to-peer private Ethereum blockchain with proof-of-authority(PoA).
What is Ethereum Proof-of-Authority(PoA) Consortium
In 2017, Ethereum co-founder Gavid Wood coined the idea of Ethereum proof-of-authority(PoA) designed for private blockchain networks in contrast to proof-of-stake(PoS) or proof-of-work(PoW) that were designed for public blockchain networks. In Ethereum proof of authority on Azure, multiple members will be running Ethereum proof-of-authority on their own with a group of their own validator nodes. Validator nodes will be acting as a miner and possess unique Ethereum addresses. Any transaction in a network will be verified if 50% of the validator nodes belonging to different members of the network reach consensus regarding any transaction. For the purpose of fairness in the network. No consortium member can choose the number of validator nodes than the previous consortium member. For example, if the previous consortium member deploys 3 validators, then each subsequent consortium member can only deploy up to 3 consortium members.
Deploying Ethereum Proof-of-Authority on Azure Our WorkFlow
We assume that there are 3 consortium members.
Each member generates their Ethereum Account using Metamask
Member 'A' deploys the Ethereum PoA on Azure using his Ethereum public address.
'A' shares the deployed consortium URL with member 'B' and 'C'.
Member 'B' and 'C' deploys Ethereum PoA using their own Ethereum public address and consortium URL provided by member 'A'.
'A' votes member 'B' as an admin.
Member 'A' and member 'B' both votes in for member 'C'.
As you have understood the theoretical concept behind Ethereum Proof-of-Authority now, we will further move towards deploying the footprint for member A on the network.
In Azure Portal go to Create a resource → Blockchain → Ethereum Proof-of-Authority Consortium. After that, we are going to specify the input configurations for Ethereum PoA deployment step by step.
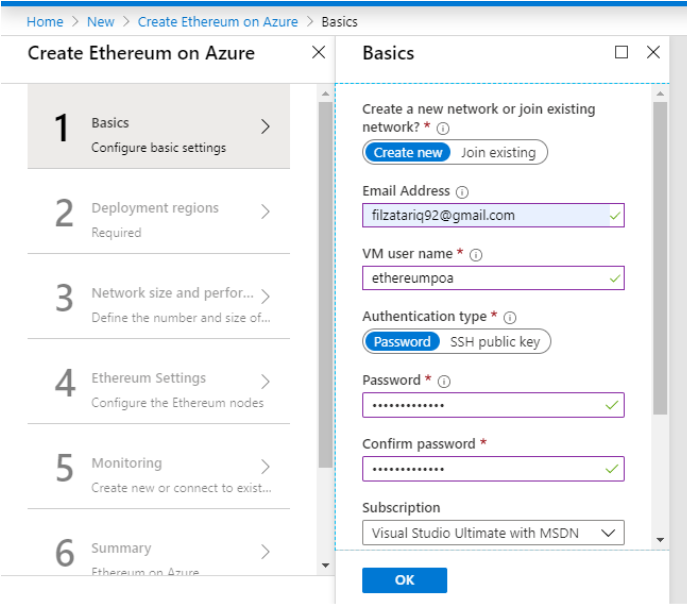
Step 1: Basics
Choose the following properties in the Basics Tab.
As we are creating a new network for now, so keep the “Create New” Option that is set by default. This will be changed in the case of member 2 when he will be joining the existing consortium network that we are currently deploying.
Provide your email address. You’ll receive an email notification when your deployment will be completed.
Choose the name of the deployed VM.
The method to authenticate the VM. Choose “Password” i.e set as default.
Set the password for the deployed VM.
Confirm your password.
Choose your subscription.
Select the resource group from the list that we had created earlier.
Choose your location
Sample Deployment
Step 1 to create Ethereum on Azure
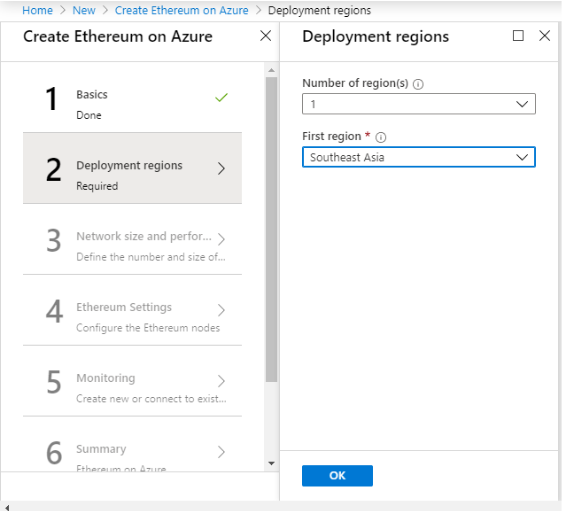
Step 2: Deployment Regions
Select the no of regions in which you want to deploy your consortium network. For this tutorial, I am just choosing 1 deployment region. You can choose more for high availability.
Choose the region same as the region of your “Resource Group”
Sample Deployment
Step 2 to create Ethereum on Azure
Step 3: Network Size and Performance
Choose the number of your validator nodes. You can choose 2 or more than 2 validator nodes for your network belonging to different geographical regions
Choose the machine specs for these validator nodes.
Sample Deployment
Step 3 to create Ethereum on Azure
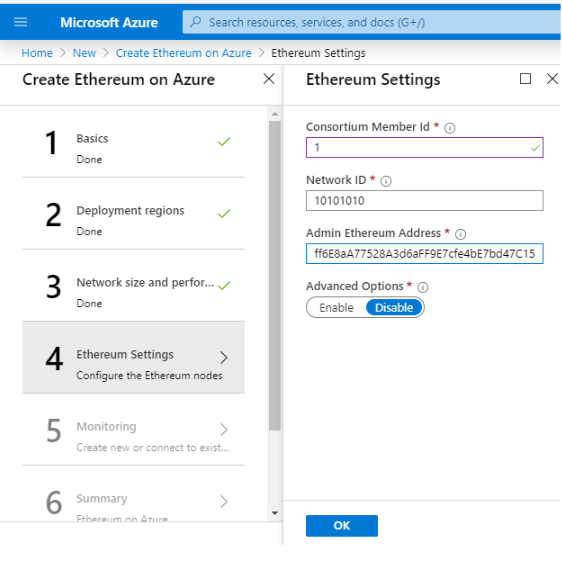
Step 4: Ethereum Settings
Choose your consortium member ID between 0-255. This member ID is unique for every consortium member. I am choosing the consortium member ID 1.
Network ID is the ID of your consortium network and is also unique to the network.
Admin Ethereum Address is where you will add your Ethereum address from Metamask. Open your Metmask extension and copy the Ethereum address of your account.
Ethereum settings Ethplode ETH
Sample Deployment
Step 4 to create Ethereum on Azure
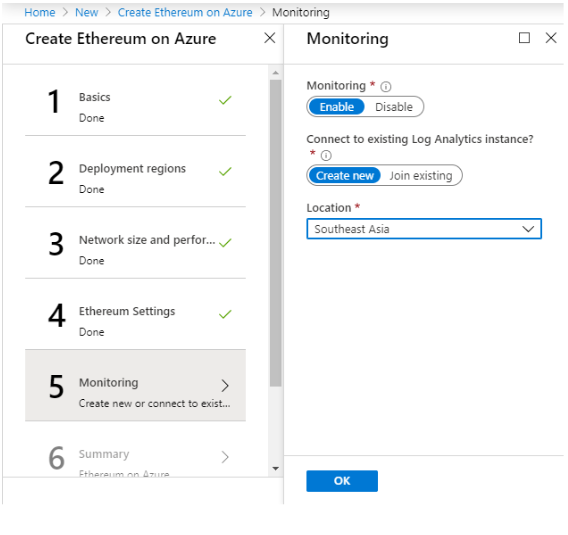
Step 5: Monitoring
If you want to collect logs from your network and check the network health enable the monitoring option that is set by default.
Create a new location to deploy the monitor instance
Sample Deployment:
Step 5 to create Ethereum on Azure
Step 6: Summary
Verify and review your deployment summary and confirm
Step 7: Buy
After that, you are going to buy the Ethereum Proof of Authority template from the Azure marketplace and deploying the network instance with above-set parameters. Your deployment will take a few minutes to succeed so be patient.
Deployment Output:
Once your deployment is successful, you will receive an email notification. After that, let's explore the output parameters of our deployment network that will be used for managing, growing and building on top of the network.
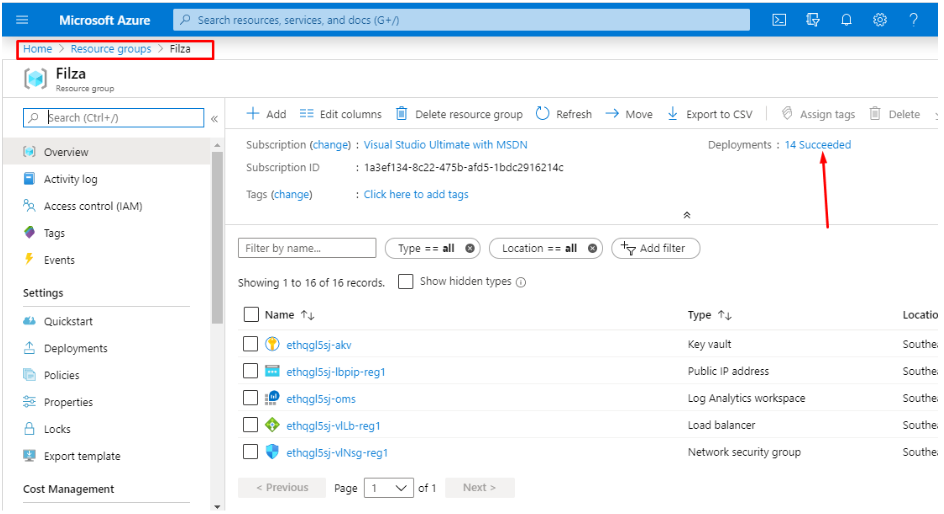
Locate your Deployment Output:
In your Azure Portal move to the “Resource Groups” and choose the resource group that you had used for Ethereum PoA deployment. In my case, the name of the resource group is “Filza”.
Move to that resource group and view your deployments.
Choosing resource name in Azure Blockchain solution
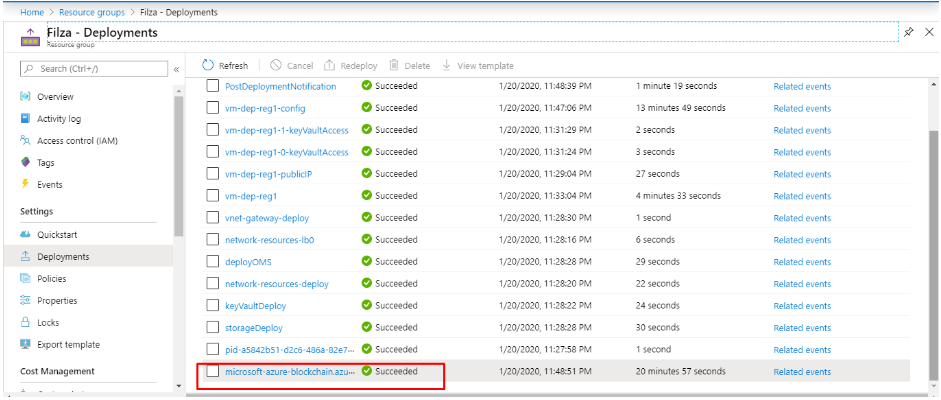
After that, click on the 14 succeeded deployments and from all the deployments you see, go to “Microsoft-azure-blockchain,azu..”
Deployments in Azure Blockchain
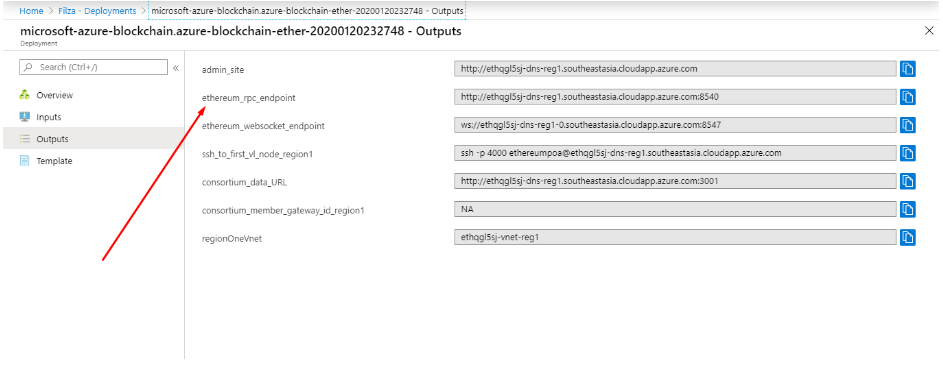
Now go to Outputs and here you can see different fields. Two fields that are useful for you now are the “consortium data URL” and “admin site”
outputs in Azure Blockchain
Consortium Data URL: You can share this URL with other consortium members so they can join your network
Admin Site: When you copy this URL and open it in a new Tab. You will be directed to a dashboard called “Governance Dashboard”. When you open this URL, a notification will pop up to connect your Ethereum Proof-of-Authority network with Metamask. Once you connect it, you can view your administrator's panel and option to nominate.
Proof of Authority Azure Blockchain
Governance Dashboard:
Every consortium deployment comes with a set of pre-deployed smart contracts and DECENTRALIZED APPlication to manage the admin and validator nodes. Admin can introduce their validator nodes in the network and the overall network is maintained by the 50% consensus of all the involved validator nodes managed by pre-deployed smart contracts.
Growing your Consortium: Member’s B Deployment Footprint
Share your consortium Data URL and your chosen number of validators with member B that you intend to invite to the network..
Member B will deploy the same Ethereum PoA network by choosing the option of “existing network” in Basics Tab and pasting the provided consortium URL in Ethereum Settings Tab.
Current admins can vote for this member B’s request in Governance Dashboard. If member B receives 50% of the admin votes, he will become the part of the network, otherwise, his request will be declined
That's all to conclude Part 1 of Azure Blockchain. In the next part of this series, we will further explore about leveraging this deployed network for building blockchain applications.
Xord can help you build Blockchain projects and give you free Blockchain consultation, connect with us and get started now! Link: https://https://blockapexlabs.com/contact/
Guide to setting up your first Hyperledger Fabric network (Part 2)
Overview
This part serves a next step after completing part 1 of the guide. In part 1, we discussed the different components that are needed to bootstrap a simple network. We formed one organization, created a channel, and joined that organization to that channel.
In this part, we are going to write a chaincode (smart contract), install and instantiate it, and interact with it. We are going to use the repository that we developed in the previous guide. The repository contains both the network and chaincode as well as useful scripts to automate crucial tasks.
What is chaincode?
Chaincode (smart contract) is a piece of code that is used to provide access to the state of the ledger in a channel. Chaincode is the only way to gain access to the ledger and the ledger cannot be accessed outside of that chaincode. Chaincode can also be used to implement access control permissions as well as complex business logic while updating or reading the data in the ledger.
If you have experience writing smart contracts using Solidity in Ethereum or other public blockchain, you might notice similarities. We have a chaincode class named FirstChaincode which has two functions that are available to be executed from outside the ledger. initLedger function adds car entries into the ledger. The second function queryAllCars returns all the car objects that have been initialized.
We use the chaincode utils developed by the TheLedger. You will find the chaincode Node.js SDK to be quite different if you look at the official chaincode samples developed by Hyperledger Fabric. These utilities are intended to make writing chaincode easier.
We are going to start the network that we built in the previous article, create and join channels, install and instantiate the chaincode, and finally call functions on the chaincode.
Building the network
Go to the network directory and run the following commands.
Starting the network
This command will start all the docker containers.
docker-compose -f docker-compose.yml up -d
Creating and joining the channel
A new channel mychannel is created and Org1 is joined to that channel.
We created a simple chaincode which adds entries in the ledger and queries them. We might get into exploring the Node.js SDK that enables us to build client applications for Hyperledger Fabric network.
If you want to get your hands on the code, you can get it here.
Guide to setting up your first Hyperledger Fabric network (Part 1)
There are two ways to go about building applications on Hyperledger Fabric framework. The first method is to use Composer and the other is work directly on core Fabric and writing chaincode using Golang, Node.js, or Java.
What is Composer and why you should stay away from it?
Hyperledger Composer is a set of tools that makes the whole process of building blockchain application faster and easier. Composer speeds up the development time significantly and provides RESTful APIs for your applications to interact with.
Composer also abstracts away essential development steps that would otherwise prove crucial to understand critical parts of the Fabric framework. While the tool is helpful for rapid prototyping and can prove vital for a non-technical or a beginner to get started, however it does abstract away the most interesting parts of the technology.
Composer is helpful to get started on learning the technology but it you wish to understand the ins and outs of technology, Composer is not the way to go.
Here, we will be building a small network with one ordering service and one organization. We will be creating one channel for that organization and bootstrap one anchor peer in this part.
In the next part, we will then be using Typescript to write chaincode in Node.js environment and install it on the peer to provide access to the ledger.
If you wish to get your hands on the code, you can find the repository here.
Installing the development environment
If you haven’t already set up the development environment for Hyperledger Fabric, I urge you to head to this article I wrote a week ago.
What we will be building
We will be creating a simple network with one ordering service (orderer), one organization with one peer. We will create one channel and then install chaincode on that channel. In real life, one channel with one organization makes no sense but we are building it like this for the sake of simplicity.
If you are not familiar with the terms that I used and want to learn the basic of Fabric, there is no better place than the official documentation.
Let’s get started
Create a new directory and name it first-network. This will be our root directory for the project.
Create a new directory inside first-network and name it network.
Create a new file call crypto-config.yaml inside network directory.
Defining orderer and organizations in crypto-config.yaml
We define the orderer and different organizations that we want to be part of the network in a .yaml file. We normally call it crypto-config.yaml. Put the following in the crypto-config.yaml file.
As we can see, we have defined one orderer and one organization. The domain/ID of the orderer is orderer.example.com and the domain of the peer organization is org1.example.com. The Template Count defines the number of peers that we want to bootstrap as part of the network and Users Count defines the number of users that will belong to that organization when the network is first created.
Defining specifications of the orderer and organizations in configtx.yaml
Create a new file called configtx.yaml inside the network directory. The project structure will now look like this.
First we define the MSP IDs of our Orderer and Org1 and also define the paths to the certificates that we will generate later. The path that we define in MSPDir does not exist right now. We will generate the certificates and create the paths later. Here, we also define the domain and port of anchor peers for our organization.
The we configure the capabilities of our network as having the ability to create new channels, etc,. Then we define Orderer specifications as running on solo consensus algorithm and its port.
Finally, we define Profiles that we will be using to refer to these specifications. We define the genesis block for our Orderer as OneOrgOrdererGenesis. The thing that we need to understand here is that there is no global blockchain ledger in the Fabric framework and ledgers are only available at the channel level. And there are two types of channels in a Fabric network, a system channel that is used by different orderers in the network and application channels that are composed of different peers at the application level. OneOrgOrdererGenesis is the profile name of the genesis block of the ledger in the system channel that is used to start the Orderer.
Then we define a consortium called SampleConsortium with Org1 as part of that consortium. And then we have the profile name of our channel called OneOrgChannel with Org1 as a member of that channel.
Create cryptographic materials
Open a terminal window in the /first-network/network directory and execute these commands.
cryptogen generate --config=./crypto-config.yaml
The Cryptogen tool that we installed in the previous article will be used to generate crypto materials to be used when signing transactions. This will create a new directory and output two more directories inside it. Our project looks like this now.
The new directories will have the crypto material for our orderer and peer organization.
Create genesis block and configuration transactions
Execute the following commands to generate a genesis block, a channel transaction, and an anchor peer configuration transaction. We will then use these configuration transactions to bootstrap a Fabric network.
Configtxgen tool that we installed in the previous article will be used to generate configuration transactions.
configtxgen uses the profile that we defined in the configtx.yaml file. The tool will look for the profile named OneOrgOrdererGenesis in the configtx.yaml.
The tool will look for a channel profile named OneOrgChannel and output a configuration transaction named channel.tx in the /config directory. We also provided the ID of the channel.
Now that we have the configuration transactions, we will now move on to using these configuration transactions to start Orderer and create a channel.
Configuring docker-compose.yml
We will be using a tool called docker-compose to start multiple docker containers that will work to simulate a Fabric network. To make things simpler, we will not be using multiple machines, we will be taking advantage of the power of docker and docker-compose to simulate multiple machines.
We will not be talking much about docker-compose here. If you want to learn more, visit docker’s documentation.
Create a new file called docker-compose.yml inside /first-network/network directory.
Paste this in docker-compose.yml.
version: '2'

networks:
  basic:

services:
  ca.example.com:
    image: hyperledger/fabric-ca
    environment:
    - FABRIC_CA_HOME=/etc/hyperledger/fabric-ca-server
    - FABRIC_CA_SERVER_CA_NAME=ca.example.com
    - FABRIC_CA_SERVER_CA_CERTFILE=/etc/hyperledger/fabric-ca-server-config/ca.org1.example.com-cert.pem
    - FABRIC_CA_SERVER_CA_KEYFILE=/etc/hyperledger/fabric-ca-server-config/c8934e1a2f95d83d34852d9615f7c92880947bc1a077a9c0ae393fa33e8e6454_sk
    ports:
    - "7054:7054"
    command: sh -c 'fabric-ca-server start -b admin:adminpw -d'
    volumes:
    - ./crypto-config/peerOrganizations/org1.example.com/ca/:/etc/hyperledger/fabric-ca-server-config
    container_name: ca.example.com
    networks:
    - basic

  orderer.example.com:
    container_name: orderer.example.com
    image: hyperledger/fabric-orderer
    environment:
    - ORDERER_GENERAL_LOGLEVEL=debug
    - ORDERER_GENERAL_LISTENADDRESS=0.0.0.0
    - ORDERER_GENERAL_GENESISMETHOD=file
    - ORDERER_GENERAL_GENESISFILE=/etc/hyperledger/configtx/genesis.block
    - ORDERER_GENERAL_LOCALMSPID=OrdererMSP
    - ORDERER_GENERAL_LOCALMSPDIR=/etc/hyperledger/msp/orderer/msp
    working_dir: /opt/gopath/src/github.com/hyperledger/fabric/orderer
    command: orderer
    ports:
    - 7050:7050
    volumes:
    - ./config/:/etc/hyperledger/configtx
    - ./crypto-config/ordererOrganizations/example.com/orderers/orderer.example.com/:/etc/hyperledger/msp/orderer
    - ./crypto-config/peerOrganizations/org1.example.com/peers/peer0.org1.example.com/:/etc/hyperledger/msp/peerOrg1
    networks:
    - basic

  peer0.org1.example.com:
    container_name: peer0.org1.example.com
    image: hyperledger/fabric-peer
    environment:
    - CORE_VM_ENDPOINT=unix:///host/var/run/docker.sock
    - CORE_PEER_ID=peer0.org1.example.com
    - CORE_LOGGING_PEER=debug
    - CORE_CHAINCODE_LOGGING_LEVEL=DEBUG
    - CORE_PEER_LOCALMSPID=Org1MSP
    - CORE_PEER_MSPCONFIGPATH=/etc/hyperledger/msp/peer/
    - CORE_PEER_ADDRESS=peer0.org1.example.com:7051
    # # the following setting starts chaincode containers on the same
    # # bridge network as the peers
    # # https://docs.docker.com/compose/networking/
    - CORE_VM_DOCKER_HOSTCONFIG_NETWORKMODE=${COMPOSE_PROJECT_NAME}_basic
    - CORE_LEDGER_STATE_STATEDATABASE=CouchDB
    - CORE_LEDGER_STATE_COUCHDBCONFIG_COUCHDBADDRESS=couchdb:5984
    # The CORE_LEDGER_STATE_COUCHDBCONFIG_USERNAME and CORE_LEDGER_STATE_COUCHDBCONFIG_PASSWORD
    # provide the credentials for ledger to connect to CouchDB.  The username and password must
    # match the username and password set for the associated CouchDB.
    - CORE_LEDGER_STATE_COUCHDBCONFIG_USERNAME=
    - CORE_LEDGER_STATE_COUCHDBCONFIG_PASSWORD=
    working_dir: /opt/gopath/src/github.com/hyperledger/fabric
    command: peer node start
    # command: peer node start --peer-chaincodedev=true
    ports:
    - 7051:7051
    - 7053:7053
    volumes:
    - /var/run/:/host/var/run/
    - ./crypto-config/peerOrganizations/org1.example.com/peers/peer0.org1.example.com/msp:/etc/hyperledger/msp/peer
    - ./crypto-config/peerOrganizations/org1.example.com/users:/etc/hyperledger/msp/users
    - ./config:/etc/hyperledger/configtx
    depends_on:
    - orderer.example.com
    - couchdb
    networks:
    - basic

  couchdb:
    container_name: couchdb
    image: hyperledger/fabric-couchdb
    # Populate the COUCHDB_USER and COUCHDB_PASSWORD to set an admin user and password
    # for CouchDB.  This will prevent CouchDB from operating in an "Admin Party" mode.
    environment:
    - COUCHDB_USER=
    - COUCHDB_PASSWORD=
    ports:
    - 5984:5984
    networks:
    - basic

  cli:
    container_name: cli
    image: hyperledger/fabric-tools
    tty: true
    environment:
    - GOPATH=/opt/gopath
    - CORE_VM_ENDPOINT=unix:///host/var/run/docker.sock
    - CORE_LOGGING_LEVEL=DEBUG
    - CORE_PEER_ID=cli
    - CORE_PEER_ADDRESS=peer0.org1.example.com:7051
    - CORE_PEER_LOCALMSPID=Org1MSP
    - CORE_PEER_MSPCONFIGPATH=/opt/gopath/src/github.com/hyperledger/fabric/peer/crypto/peerOrganizations/org1.example.com/users/[email protected]/msp
    - CORE_CHAINCODE_KEEPALIVE=10
    working_dir: /opt/gopath/src/github.com/hyperledger/fabric/peer
    command: /bin/bash
    volumes:
    - /var/run/:/host/var/run/
    - ./../chaincode/:/opt/gopath/src/github.com/phr
    - ./crypto-config:/opt/gopath/src/github.com/hyperledger/fabric/peer/crypto/
    networks:
    - basic
As you can probably guess, we will be using docker-compose to start five containers namely ca.example.com, orderer.example.com, peer0.org.example.com, couchdb, and cli.
ca.example.com will be used to issue identities to the users in the network. The certificate authority is owned by Org1.
orderer.example.com will be the orderer of our network.
peer0.org.example.com will be the only peer in our network which will host our ledger and chaincode.
couchdb is the container for the database.
cli is used to install and instantiate chaincode on peer0 owned by Org1.
The orderer container uses the genesis.block that we generated earlier to start the orderer.
Before we start the network, we need to do a very important change in the docker-compose.yml.
Execute this command from the network directory.
ls crypto-config/peerOrganizations/org1.example.com/ca
You will see a file with _sk appended at the end. Copy the name of the file, the secret key of our CA. Go back to docker-compose.yml file and search for the keyword “secret_key_here”. Replace the phrase “secret_key_here” with the name of the file you just copied. We are good to go now.
Starting the network
Run the command to start the network.
docker-compose -f docker-compose.yml up -d ca.example.com orderer.example.com peer0.org1.example.com couchdb
The command will start four containers that will form our network.
You can verify the containers that are running by executing the command.
docker ps
You should see an output like this.
CONTAINER ID        IMAGE                        COMMAND                  CREATED             STATUS              PORTS                                            NAMES
621bbda9f6ac        hyperledger/fabric-peer      "peer node start"        4 seconds ago       Up 3 seconds        0.0.0.0:7051->7051/tcp, 0.0.0.0:7053->7053/tcp   peer0.org1.example.com
1e3f3476f727        hyperledger/fabric-orderer   "orderer"                7 seconds ago       Up 4 seconds        0.0.0.0:7050->7050/tcp                           orderer.example.com
32fcf0d2baa9        hyperledger/fabric-ca        "sh -c 'fabric-ca-se…"   7 seconds ago       Up 4 seconds        0.0.0.0:7054->7054/tcp                           ca.example.com
de9b898e3c09        hyperledger/fabric-couchdb   "tini -- /docker-ent…"   7 seconds ago       Up 4 seconds        4369/tcp, 9100/tcp, 0.0.0.0:5984->5984/tcp       couchdb
If you see a similar output as above, you have successfully started a Hyperledger Fabric network.
Now, we will create a channel and join Org1 to that channel.
Creating and joining channel
Executing the following command will create a new channel called mychannel.
Now, our peer from Org1 is joined to the channel mychannel.
Conclusion
We created the simplest network with one orderer and one organization. In reality, there are multiple orderers and multiple organizations connected to multiple channels. We might get into exploring it later down the line.
If you want to get your hands on the code, you can get it here.
In the next part, we will learn to code chaincode in Node.js and install it on our peer.
The Right Way To Set-up The Hyperledger Fabric Development Environment
Hyperledger Fabric is an exciting technology and is progressing rapidly with the approach of move fast and break things so it can sometimes turn out to be a soul-destroying task to set up the Fabric development environment. Even the official documentation falls short of discussing everything there is in setting up the environment. So, I have written this guide to lay down all the steps you will need to go through to set up the development environment. I will try to keep this guide updated to reflect the latest changes in the Fabric protocol.]
Understanding the basics
I am not going to bore you with explaining what blockchain is and why it matters and explain the use cases of permissioned blockchain technology frameworks like Hyperledger Fabric. If you want to learn the basics of blockchain, Hyperledger Fabric, and its use cases. There is no better way than to study the official documentation here.
Installing the development environment
Installing one wrong package version might generate errors that can take days to debug. These steps have been tested to work well on Ubuntu 18.04 LTS.
Let us get started.
Installing cURL
cURL is a tool that is used to transfer data over the internet.
Execute the command to install cURL.
sudo apt-get install curl
Installing Docker
Docker is a tool designed to make it easier to create, deploy, and run applications in virtual containers. We will use docker to set up simulate different peers in the network. We use docker CLI container to interact with the peers and ordering service, install and upgrade chaincode, and create and join channels.
Uninstall previous docker packages.
If you previously installed docker on your machine. You will need to remove all previous docker packages.
To identify what installed package you have:
dpkg -l | grep -i docker
If you see packages like docker-engine, docker, docker.io. Write them like in the command below. It is possible that you have other packages of docker, you will need to uninstall them too.
The above commands will not remove images, containers, volumes, or user created configuration files on your host. If you wish to delete all images, containers, and volumes run the following commands:
You need to eliminate the requirement of using sudo while working with docker
Create the docker group.
sudo groupadd docker
Add your user to the docker group.
sudo usermod -aG docker $USER
Log out and log back in.
Try running the docker command without sudo and verify if the above steps were successful.
docker run hello-world
Installing docker-compose
Docker Compose is a tool for running multi-container Docker applications. You need to define all the containers that your application depends on in a .yaml file. Then, with one single command, all the service are started and your application starts running.
Run this command to download the latest version of Docker Compose.
Go language is used to write chaincode business logic for the channels. You can also write chaincode in Node.js and Java. Whichever language you decide to use, you need to set up the $GOPATH.
You need to set a new prefix for npm to eliminate the need of using sudo while installing packages.
Go to your home directory and create a directory for global installations.
mkdir ~/.npm-global
Configure npm to use the new directory path for installations.
npm config set prefix '~/.npm-global'
Open the file~/.profile file.
nano ~/.profile
Add this line at the bottom of the file.
export PATH=~/.npm-global/bin:$PATH
Save the file and exit with CTRL + X, press Y, and then press ENTER.
On the command line, update your system variables:
source ~/.profile
Installing Hyperledger Fabric packages.
The documentation of Hyperledger Fabric provides a script that will download and install samples and binaries to your system. These sample applications installed are useful to learn more about the capabilities and operations of Hyperledger Fabric.
Go to your home directory and execute the following command.
This will install 1.4 version of Hyperledger Fabric binaries.
The command above downloads and executes a bash script that will download and extract all of the platform-specific binaries you will need to set up your network.
It also retrieves some executable binaries that are needed in development and places them in the bin sub-directory of the current working directory.
To set these binaries to be run from anywhere on your machine. Open the file~/.profile file.
nano ~/.profile
Add this line at the bottom.
export PATH=~/fabric-samples/bin:$PATH
Save the file and exit with CTRL + X, press Y, and then press ENTER.
On the command line, update your system variables:
source ~/.profile
Run the sample network
Go to the first-network directory.
cd fabric-samples/first-network
Run the following command to generate crypto materials, start the network, and install chaincode.
./byfn.sh up
The above command will bootstrap a sample network with fabcar chaincode installed. You can head to here to learn more about the network that we have just started.
Conclusion
After a year of development on Hyperledger Fabric framework, I have realized the importance of getting small things right when setting up the environment. Many errors that you might face during development might well be due to the mistakes in setting up the environment.
I hope this guide will help beginners starting to learn this new technology. Please feel free to point out mistakes in this guide.
Get in touch
Interested in starting your own blockchain project, but don’t know how? Get in touch at https://blockapexlabs.com/contact