Deep Dive into Azure Blockchain for Enterprise Blockchain Solutions [Part 2]

The essence of building Azure Blockchain-based solutions is a 3-Step simple approach for leveraging Blockchain for businesses with easy integration of components. Azure Blockchain facilitates to automate most of the part for developers, hence assisting the developers to directly focus on building their Blockchain application logic. Here is the 3-Step approach that is crucial to Blockchain development with Azure:

Choose the Underlying Network:

Building the foundation of your Blockchain network by choosing a consortium network. Azure Blockchain Service provides you with the flexibility to deploy pre-configured templates of consortium networks. Azure Blockchain provides support for almost every popular consortium network including Hyperledger Fabric, Corda, Ethereum PoA, Quorum etc.

Model Smart Contracts

Once you choose a network, you need to build your Blockchain application logic on the top of that. For that very purpose, Azure Blockchain provides you with Azure Blockchain Development Kit for Visual Studio Code. Azure Blockchain Development kit assists the testing of smart contracts and deployment of smart contracts on Azure Blockchain networks, public networks like Ethereum or even locally deploying the smart contracts on Ganache.

Extending Your Application

After setting your Blockchain network and modelling the smart contracts you need an additional layer to interact with these smart contracts and writing or reading data from the ledger. Azure Blockchain Our Workbench accelerates the development process by providing support for extending your Blockchain application. It also provides the flexibility to integrate your Blockchain application with the existing apps and databases that your business uses already.

In Part 1 of Azure Blockchain for Enterprise Blockchain solutions series, we had exercised Step 1 of this three-step approach and launched an Ethereum Proof-of-Authority (PoA) network on Azure. Now, in the second part of the series, we will further learn about writing and deploying a simple smart contract on the Ethereum PoA network that we had deployed in Part 1.

In this article we will look at the following two methods for deploying your smart contracts on Ethereum PoA network:

If you want to deploy the smart contract for learning and testing purposes, it’s preferred to go with the first method that is using Remix (a browser IDE for compiling, testing and deploying smart contracts). However, if you are developing a product with Azure Ethereum PoA, it is advisable to go with the second method as Truffle provides you with a fine structure for managing the different components of your Blockchain application. 

In this tutorial, we are going to explore both the methods with a very simple test smart contract deployment on Ethereum PoA. So let's get started with the fun part.

Method 1 of 2: Using Remix for deploying smart contracts to Azure Ethereum PoA

There are no prerequisites for this method except the Metamask extension that you must already have installed if you have followed the first part of this Azure Blockchain series. 

Step 1: Writing Smart Contract

Navigate to https://remix.ethereum.org and click on the (+) button at the top left to add a new smart contract. Name the smart contract as “news.sol”. Now copy the following smart contract in your “news.sol” file:

[code language="javascript"]

pragma solidity >=0.4.0 <=0.6.0;
contract News{
struct newsFeed{
address publisher;
string newsDesc;
}
mapping(uint => newsFeed) public newsFeeds;
uint public newsCount;

function addNews(string memory _newsDesc) public {
newsCount++;
newsFeeds[newsCount].publisher = msg.sender;
newsFeeds[newsCount].newsDesc = _newsdesc;

}
}
[/code]

This is a very simple contract I have written for testing purposes. The mapping in solidity is like an associative array that maps the integer index with newsfeed structure here. Every time you add a piece of new news that is a simple string, the newscount is incremented, that is used as an index to access and store data in the newsfeed structure. Msg.sender in solidity denotes the Ethereum address of the caller of the contract.

So now as you have written your smart contract, navigate to the solidity compiler in the left pane in Remix and compile your contract.

Your smart contract will hopefully compile without any errors if you’re not at bad luck today.

Step 2: Deploying smart contract on Ethereum PoA

As your smart contract has compiled successfully it is ready to get deployed on the network that in our case is Ethereum Proof-of-Authority Network on Azure. Now in part 1 of this series after deploying the Ethereum PoA we got the deployment outputs containing the field like Ethereum RPC, admin site etc. So now we are going to use the deployment outputs here to deploy our smart contract on the network.

In your Azure Portal navigate to ResourceGroup→ Deployments→ Microsoft-azure-blockchain…→ Outputs and copy the Ethereum RPC endpoint to your keyboard.

Azure Portal navigate to ResourceGroup

RPC in the Blockchain is a data exchange protocol that allows for communication between your browser and your Blockchain network or node.

Now let's add this Ethereum RPC endpoint in Metamask so we can deploy the smart contract to Ethereum PoA network from Remix. Open Metamask extension in the browser and navigate to Settings→ Networks→ Add Network and paste the RPC endpoint you just copied into New RPC URL field. Adding into this field will connect your Metamask to Ethereum PoA network.

Once your Ethereum PoA network is connected, navigate to the “Deploy & run transactions” pane in Remix and click on Deploy.
Deploy and run transactions

This will successfully deploy your smart contract on your Ethereum PoA network. You can now view your contract in the Deployed Contracts section of remix and can interact with it by adding into the fields.
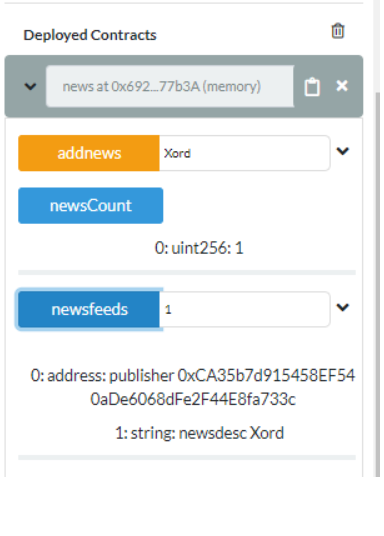
Deployed contracts section

Method 2 of step 2: Using Truffle and HD Wallet Provider

In this method, you are going to use truffle for deploying your contracts. You need the following prerequisites for this method:

  1. Truffle Suite: Client-based Ethereum development environment
  2. Any code editor of your choice. However, if you are working with Azure Blockchain I would suggest you go with VS code as it allows you to interact with your network using Azure Blockchain Development that comes handy.

So now let's deploy our smart contract on Ethereum PoA using Truffle step-by-step.

Step 1: Create a Truffle Project

Run your command prompt as an administrator, navigate to the folder in which you want to create the truffle project and type the following command:

Truffle init

This will set a project layout for you in the selected folder like below:
Folder selection
Folder selection

Now let's add our smart contract in the contracts folder. You can use the same smart contract here that we have used in method 1.

Step 2: Adding Migrations

Navigate to the migration folder of your smart contract and create a new file named “2_deploy_contracts.js” for the “news.sol” contract. Paste the following code in this newly created file.

[code language="javascript"]
var news = artifacts.require("News");

module.exports = function(deployer)
{
deployer.deploy(news);
};

[/code]

Step 3: Adding your network settings

Now we are going to do the real work of deploying our smart contract on Ethereum PoA on Azure using Truffle.

Truffle gives you a “truffle-config.js” file to add your network settings. We are going to modify this file to add our Ethereum PoA network settings. For that purpose paste the following code in your “truffle-config.js” file:

[code language="javascript"]
const HDWalletProvider = require("@truffle/hdwallet-provider");
const rpc_endpoint = "Your RPC endpoint of ethereum PoA";
const mnemonic = "Your unique seed phrase";

module.exports = {
networks: {
development: {
host: "localhost",
port: 8545,
network_id: "*" // Match any network id
},
poa: {
provider: function() {
return new HDWalletProvider(mnemonic, rpc_endpoint)
},
network_id: 10101010,
gasPrice : 0
}
}
};

[/code]

In const rpc_endpoint add your PoA network endpoint and in mnemonic add you unique Metamask account phrase. You can find that in Metamask → Security & Privacy → Reveal seed phrase.

Truffle HD wallet provider: For privacy reasons, truffle provides you with HD wallet provider that signs your transactions for you using your private key rather giving access of your private key to any third-party.

Since we are using truffle HD wallet provider in our project, you can install the HD wallet in your project with the following command:

npm install @truffle/hdwallet-provider

Step 4: Deploying your Smart Contract

Now in your command prompt add the following command:
truffle migrate --network poa
This will start your deployment to your Ethereum PoA network on Azure.
Deploying your smart contract

However, you must use truffle version 5.0.5 to deploy your smart contract on Ethereum PoA. The latest version of truffle points some gas-related errors with Azure deployments. You can downgrade your truffle version with the following command:

npm i -g [email protected]

Step 5: Sending transaction to your network

As now you have deployed your smart contract to the Ethereum PoA network lets send a transaction to our network. In your project folder create another file with the name “sendtransaction.js” and paste the following code in that file:

[code language="javascript"]
var news = artifacts.require("news");
module.exports = function(done) {
console.log("Getting the deployed version of the news smart contract")

news.deployed().then(function(instance) {

console.log("Calling add news function for contract ", instance.address);

return instance.addnews("Hello, Xord!");

}).then(function(result) {

console.log("Transaction hash: ", result.tx);
console.log("Request complete");

done();

}).catch(function(e) {

console.log(e);

done();

});

};
[/code]

Now execute this script with the following command in the command prompt:
Deployment on the Ethereum Proof of Authority network on Azure

truffle exec sendtransaction.js --network poa
And Hurrah! Your smart contract is successfully deployed on the Ethereum Proof of Authority network on Azure!

That’s all for the part 2 of this Azure Blockchain for Enterprise Blockchain Solutions series. In this part, we have practised the second step of the Azure Blockchain 3 Step approach for building Blockchain applications. In the third and final part of the series, we will learn about building and modelling Blockchain applications with Azure Blockchain Our Workbench. Happy Chaining till then!

Find more articles on Blockchain on our blog https://blockapexlabs.com/publications/ or contact Xord @https://https://blockapexlabs.com/contact/ for Blockchain projects and free consultation.

Deep Dive into Azure Blockchain for Enterprise Blockchain Solutions [Part 1]

With the emergence of enterprise blockchain, an increasing number of businesses are moving towards the adoption of blockchain for mitigating the problems associated with supply chain, finance, asset tracking and many more. With this increasing interest in business blockchain, one must understand that blockchain isn’t a magical hammer that alone can be harnessed to fix every problem. Blockchain needs the support of other technologies like traditional databases, client-side applications, etc. to provide complete enterprise blockchain-based solutions that are viable in terms of scalability, flexibility and portability. For example, in a supply chain management system, only one or two use cases are aided with blockchain, and the rest of the application is built on other technologies even including traditional databases. That is, in fact, the beauty of enterprise blockchain. Enterprise blockchain solutions sometimes move away from the concept of decentralization but exploit the other features of blockchain in addressing business problems. So one of the major challenges associated with the adoption of blockchain in enterprises is the integration of all these business components together. If you are a blockchain developer you must be aware of the fact that Integrating a blockchain application with the current applications like SaaS, Salesforce, Office, etc isn’t a trivial task and requires added effort. So that’s where Microsoft’s Azure Blockchain creates its space. Microsoft proposes Azure Blockchain to solve the problems associated with the integration of business components and making the overall process seamless and efficient. Microsoft Azure provides built-in infrastructure, tools and services for building a viable, robust, scalable and efficient business solution employing blockchain technology. As now you have got a basic overview of enterprise blockchain, let’s dig down further and explore the tools we have available in Azure Blockchain for building efficient blockchain applications. 

Microsoft Blockchain
  1. Azure Blockchain Service:

Azure blockchain service allows the deployment of the network on Azure with the control of infrastructure management and nodes management on consortium network. Businesses can choose from a variety of popular networks including Ethereum Proof-of-Authority, Corda and Quorum. It also provides the flexibility to introduce your own consortium network into the Azure marketplace on your varying business needs. Azure blockchain services simplify the network management part of the solution, thus facilitating developers to focus directly on the application building part.

  1. Azure Blockchain Our WorkBench 

Allows for building applications on a wide variety of blockchain networks in less time and cost by providing pre-built integrations to cloud services, authenticated APIs for REST requests and identity management by linking your identities with Azure Active Directory.

  1. Azure Blockchain Tokens

Allows you to integrate token in your blockchain solution with the pre-built token templates designed by considering the needs of common blockchain solutions. Businesses can also customize the token templates based on their own varying needs. Azure Blockchain Tokens is currently in preview stage.

As now you have got a general idea of what Azure Blockchain is, are you ready to actually see things in action by playing with Azure Portal? Let’s start.

Pre-Requisites:

  1. Azure Account: You can get a free Azure Account with $200 credit for 30 days if you don’t have an Azure account already. 
  2. Metamask : If you don’t have Metamask wallet configured already, you can follow the steps in this article to configure and setup your Metamask wallet with fake test ethers.

Getting Started

Once you log in to your Azure Portal you’ll see the following Dashboard:

Azure portal dashboard

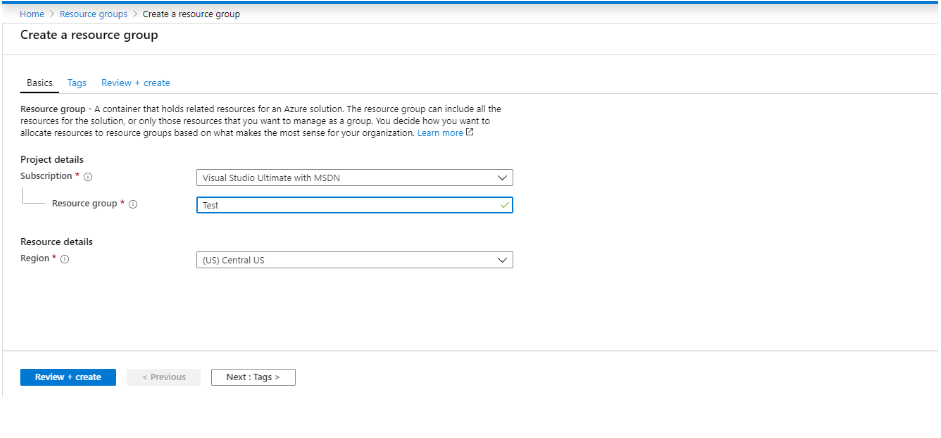
Before starting with Azure Blockchain services, create a resource group in Azure. Azure Resource groups allow you to store your related logical collections at one place for effective management. You will be using this resource group later in this tutorial. Move to Resource Groups -> Add and choose your Azure subscription, resource group name and your nearest region. After providing all these details click on “Review+Create” to set-up your resource. 

Resource group in Azure solution

Now as you have created your resource group let’s explore the blockchain services provided by Azure.

What We are Going To Do

In this part of Azure Blockchain tutorial, we are going to set up a blockchain network on Azure Blockchain first. In Azure Blockchain we can choose from a variety of consortium networks including Quorum, Corda etc. For this tutorial, we are going to set-up a multi-node peer-to-peer private Ethereum blockchain with proof-of-authority(PoA).

What is Ethereum Proof-of-Authority(PoA) Consortium

In 2017, Ethereum co-founder Gavid Wood coined the idea of Ethereum proof-of-authority(PoA) designed for private blockchain networks in contrast to proof-of-stake(PoS) or proof-of-work(PoW) that were designed for public blockchain networks. In Ethereum proof of authority on Azure, multiple members will be running Ethereum proof-of-authority on their own with a group of their own validator nodes. Validator nodes will be acting as a miner and possess unique Ethereum addresses. Any transaction in a network will be verified if 50% of the validator nodes belonging to different members of the network reach consensus regarding any transaction. For the purpose of fairness in the network. No consortium member can choose the number of validator nodes than the previous consortium member. For example, if the previous consortium member deploys 3 validators, then each subsequent consortium member can only deploy up to 3 consortium members. 

Deploying Ethereum Proof-of-Authority on Azure Our WorkFlow

We assume that there are 3 consortium members.

  1. Each member generates their Ethereum Account using Metamask
  2. Member 'A' deploys the Ethereum PoA on Azure using his Ethereum public address.
  3. 'A' shares the deployed consortium URL with member 'B' and 'C'.
  4. Member 'B' and 'C' deploys Ethereum PoA using their own Ethereum public address and consortium URL provided by member 'A'.
  5. 'A' votes member 'B' as an admin.
  6. Member 'A' and member 'B' both votes in for member 'C'. 

As you have understood the theoretical concept behind Ethereum Proof-of-Authority now, we will further move towards deploying the footprint for member A on the network.

In Azure Portal go to Create a resource → Blockchain → Ethereum Proof-of-Authority Consortium. After that, we are going to specify the input configurations for Ethereum PoA deployment step by step.

Step 1: Basics

Choose the following properties in the Basics Tab.

  1. As we are creating a new network for now, so keep the “Create New” Option that is set by default. This will be changed in the case of member 2 when he will be joining the existing consortium network that we are currently deploying.
  2. Provide your email address. You’ll receive an email notification when your deployment will be completed.
  3. Choose the name of the deployed VM.
  4. The method to authenticate the VM. Choose “Password” i.e set as default.
  5. Set the password for the deployed VM.
  6. Confirm your password.
  7. Choose your subscription.
  8. Select the resource group from the list that we had created earlier.
  9. Choose your location

Sample Deployment

Step 1 to create Ethereum on Azure

Step 2: Deployment Regions

  1. Select the no of regions in which you want to deploy your consortium network. For this tutorial, I am just choosing 1 deployment region. You can choose more for high availability.
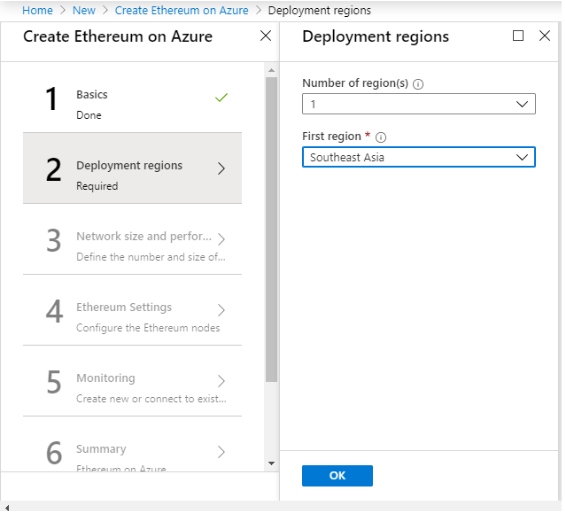
  2. Choose the region same as the region of your “Resource Group”

Sample Deployment

Step 2 to create Ethereum on Azure

Step 3: Network Size and Performance

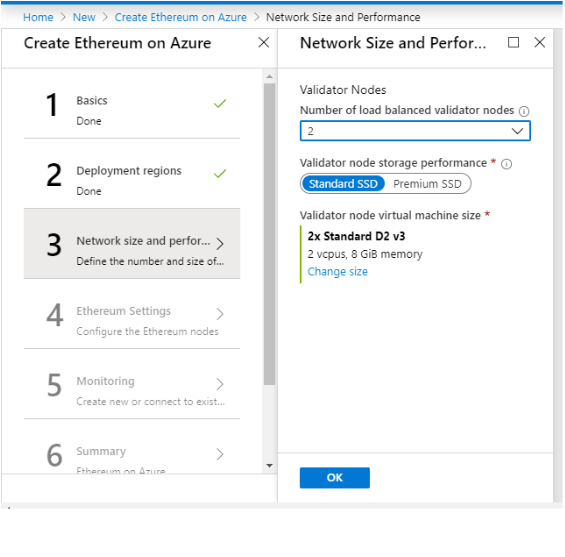
  1. Choose the number of your validator nodes. You can choose 2 or more than 2 validator nodes for your network belonging to different geographical regions
  2. Choose the machine specs for these validator nodes.

Sample Deployment

Step 3 to create Ethereum on Azure

Step 4: Ethereum Settings

  1. Choose your consortium member ID between 0-255. This member ID is unique for every consortium member. I am choosing the consortium member ID 1.
  2. Network ID is the ID of your consortium network and is also unique to the network.
  3. Admin Ethereum Address is where you will add your Ethereum address from Metamask. Open your Metmask extension and copy the Ethereum address of your account. 
Ethereum settings Ethplode ETH

Sample Deployment

Step 4 to create Ethereum on Azure

Step 5: Monitoring

  1. If you want to collect logs from your network and check the network health enable the monitoring option that is set by default.
  2. Create a new location to deploy the monitor instance

Sample Deployment:

Step 5 to create Ethereum on Azure

Step 6: Summary 

Verify and review your deployment summary and confirm

Step 7: Buy

After that, you are going to buy the Ethereum Proof of Authority template from the Azure marketplace and deploying the network instance with above-set parameters. Your deployment will take a few minutes to succeed so be patient.

Deployment Output:

Once your deployment is successful, you will receive an email notification. After that, let's explore the output parameters of our deployment network that will be used for managing, growing and building on top of the network.

Locate your Deployment Output:

In your Azure Portal move to the “Resource Groups” and choose the resource group that you had used for Ethereum PoA deployment. In my case, the name of the resource group is “Filza”.

Move to that resource group and view your deployments.

Choosing resource name in Azure Blockchain solution

After that, click on the 14 succeeded deployments and from all the deployments you see, go to “Microsoft-azure-blockchain,azu..”

Deployments in Azure Blockchain

Now go to Outputs and here you can see different fields. Two fields that are useful for you now are the “consortium data URL” and “admin site”

outputs in Azure Blockchain

Consortium Data URL: You can share this URL with other consortium members so they can join your network

Admin Site: When you copy this URL and open it in a new Tab. You will be directed to a dashboard called “Governance Dashboard”. When you open this URL, a notification will pop up to connect your Ethereum Proof-of-Authority network with Metamask. Once you connect it, you can view your administrator's panel and option to nominate.

Proof of Authority Azure Blockchain

Governance Dashboard:

Every consortium deployment comes with a set of pre-deployed smart contracts and DECENTRALIZED APPlication to manage the admin and validator nodes. Admin can introduce their validator nodes in the network and the overall network is maintained by the 50% consensus of all the involved validator nodes managed by pre-deployed smart contracts. 

Growing your Consortium: Member’s B Deployment Footprint

  1. Share your consortium Data URL and your chosen number of validators with member B that you intend to invite to the network..
  2. Member B will deploy the same Ethereum PoA network by choosing the option of “existing network” in Basics Tab and pasting the provided consortium URL in Ethereum Settings Tab.
  3. Current admins can vote for this member B’s request in Governance Dashboard. If member B receives 50% of the admin votes, he will become the part of the network, otherwise, his request will be declined

That's all to conclude Part 1 of Azure Blockchain. In the next part of this series, we will further explore about leveraging this deployed network for building blockchain applications. 

Xord can help you build Blockchain projects and give you free Blockchain consultation, connect with us and get started now!
Link: https://https://blockapexlabs.com/contact/