Introduction to TRON Blockchain

What is TRON?

Justin Sun founded TRON back in 2017. It is is a Blockchain platform that aims to become a worldwide free content entertainment ecosystem, with a decentralized infrastructure for the internet. Its main focus is to expand the market of decentralized digital entertainment applications with easier creation and deployment methods. TRON protocol has become one of the largest Blockchain-based ecosystem in the world with high scalability, high throughput computing and high availability for all the dApps built in the TRON ecosystem. With TRON, digital content and application developers will not need a middleman like Netflix or Google Play Store for them to get their products out in the market. It gives more autonomy to the user by letting him publish and store his data, and own it as well. The platform takes care of the distribution and subscription of the content and forms a decentralized content entertainment system by letting the users release and share cost-effective digital content. Other than just being a decentralized content sharing platform, TRON enables developers to create a broad range of dApps and customized wallets on the TRON Blockchain. To sum up, the opportunities and possibilities of building utility applications are unlimited in TRON!

How can you use TRON?

When a digital content creator creates and deploys content on the Tron Blockchain, he receives all the payments for every view, like, share, upvote or clap directly, without the interference of a middleman or a company that deducts its profit share.

The users who want to access the content, pay for the content with the native cryptocurrency of TRON i.e Tronix (TRX), which go the producers' accounts without any interventions.

What is Tronix?

The native cryptocurrency of TRON is Tronix (TRX). Tronix is available on exchanges like Binance and Bittrex. Every time when a block is verified by the Super Regulator in TRON Blockchain, a Tronix is mined. Or you can simply purchase them by exchanging them with other cryptocurrencies like BTC and ETH. Its isn't possible to purchase Tronix with fiat currency, debit or credit card. You must buy Bitcoin or Ethereum with cash/ on an exchange such as Coinbase and can easily exchange them with TRON. There are a number of Tronix wallets out there that you can use to store your Tronix. Ledger Nano X&S, Trust, Cobo, Wallet.io, Exodus and Tronscan just to name a few. These wallets are divided into categories of Hardware, Android & iOS, desktop and Web, you can choose any according to your needs. In addition, TRX will cost a minimum of $40 until the end of 2020, as expected by Wall Street experts. To get a better idea of Tronix, visit TRON official.

TRON Virtual Machine

Much like Ethereum Virtual Machine, TRON has its own TRON Virtual Machine, made for the TRON ecosystem. It provides a convenient, scalable and stable custom-built blockchain system to developers worldwide. TVM supports DPoS and it can get connected to any current development ecosystem. TVM is also compatible with the EVM environment, which helps developers skip the learning a new language part and jump directly to development, debugging and compiling smart contracts using Solidity or other languages as well. All of the smart contracts made on Ethereum Virtual Machine are executable on TVM. Bandwidth is a concept in TVM, works like Gas in EVM. Bandwidth can be earned by staking TRX. It is used for normal TRX transaction and TRC10 transactions. Simply put, energy is used to interact with smart contracts. You can earn it by staking TRX. TVM comes with a lightweight architecture that reduces the consumption of resources, hence gives better system performance. Not just this, it also comes with all-in-one interfaces to help deploy and view/check smart contracts, making the process easier for the developers.

These are the interfaces available in TRON Wallet-CLI:

TRC10 and TRC20:

TRC10:

TRC-10 is a token standard that has TRON native Blockchain support. TRC-10 tokens are available on the mainnet of TRON since its transfer from Ethereum to its own Blockchain platform. You don't have to have programming knowledge or TVM to create TRC10. These simple steps below can guide you on how to create TRC -10 token:

  1. Acquire as much as 1024 Tronix
  2. Visit Tronscan.org
  3. Create a wallet there (Hover to the upper right of the screen and click Sign In > Import a Wallet > Create Wallet)
  4. Now send 1024 TRX/Tronix to your Tronscan wallet
  5. Go back to Tronscan's page to create TRC10 tokens and fill the items that are required, (Token Name, Token Abbreviation, Brief Introduction, Official Website, Maximum Bandwidth, Total Supply, Issuing Exchange Rate in TRX and Token Freeze)

The ease in the issuing of TRC10 tokens lessens the development cost in the end. However, TRC10 tokens are still used thoroughly in real-world projects like BitTorrent Token (BTT), a popular decentralized file-sharing application that has over 100 million users.

TRC20:

Unlike TRC10, TRC20 is a technical standard meant for smart contracts that help implement tokens with the TRON Virtual Machine. TRC20 tokens are compatible with Ethereum's ERC-20 token standard. This makes the TRC20 tokens usable in Ethereum based smart contracts. This allows developers to send their Ethereum- based smart contracts to TRON. As TRC20 has some complexities, TRC10 are widespread in terms of usage. However, TRC20 tends to give better functionality to TRON-based tokens.

Handy Tools and Insights for Developers:

Smart Contract Language:

It is important that you have experience with Solidity programming language to write smart contracts on the TRON Blockchain. The TRON Virtual Machine is compatible with EVM environments. Hence, as a developer, you can easily create, debug and run smart contracts in a mixed environment with the smart contract programming language, Solidity.

Interfacing with Javascript:

It is essential to have experience with Javascript for interfacing with Blockchain with this tool. As a developer, you can build decentralized applications using Tron Web, such as Chrome Extensions and websites.

Command Line Experience:

In addition to all the above requirements, it is necessary to have the command-line experience to interact with and to run the apps.

Tools:

TRON Web

TRON Web connects developers with the TRON Blockchain, in the simplest words. It makes sure to give you a seamless development experience, very similar to Ethereum's Web3 implementation. TRON offers a unique feature set with cool new development tools for integrating decentralised apps in the browser, Node.js and IoT devices. TRON Web also requires a Solidity Hub as well as a Full Hub that runs on the HTTP API. You can also utilize TRON Web to exchange, buy, freeze and unfreeze different tokens, most importantly, Tronix.

TRON Box

As a developer, you can write, deploy and debug Solidity smart contracts with TRON-Box, a development framework based on the TRON Virtual Machine. Much like Truffle in Ethereum, TRON Box is also a development and testing framework for the TRON Blockchain using TRON Virtual Machine.

TRON Grid

TRON Grid enables the developers to access essential tools to build decentralized applications on the TRON Blockchain. It uses SpringBoot to issue query interface. TRON Grid takes up Java-TRON and writes the events into MongoDB and the user is able to poll smart contract's details. It enables developers to fabricate and deploy their dApps and smart contracts. TRON Grid provides a load-balanced and hosted API for developers, to run hub in the cloud and so you won't have to worry about running one yourself while working with Tron. It also offers a test network, namely 'Shasta'.

Tron Studio

TRON Studio is an IDE with an integrated TVM. It allows developers to choose which environment they might want to use for deploying their smart contracts. TRON Studio comes with an inner Full Hub that can make a private local environment for the developer to test their previously deployed smart contracts. In addition, it provides the developers with a user-friendly environment that lets the developers connect with their smart contracts made with Solidity.

After this overview, we will further dive into how TRON functions, tutorials and technical articles that will be helpful to Blockchain developers.

Want to know about more use cases of Blockchain? Talk to our Blockchain experts from Xord here and get FREE consultation.

Deep Dive into Azure Blockchain for Enterprise Blockchain Solutions [Part 2]

The essence of building Azure Blockchain-based solutions is a 3-Step simple approach for leveraging Blockchain for businesses with easy integration of components. Azure Blockchain facilitates to automate most of the part for developers, hence assisting the developers to directly focus on building their Blockchain application logic. Here is the 3-Step approach that is crucial to Blockchain development with Azure:

Choose the Underlying Network:

Building the foundation of your Blockchain network by choosing a consortium network. Azure Blockchain Service provides you with the flexibility to deploy pre-configured templates of consortium networks. Azure Blockchain provides support for almost every popular consortium network including Hyperledger Fabric, Corda, Ethereum PoA, Quorum etc.

Model Smart Contracts

Once you choose a network, you need to build your Blockchain application logic on the top of that. For that very purpose, Azure Blockchain provides you with Azure Blockchain Development Kit for Visual Studio Code. Azure Blockchain Development kit assists the testing of smart contracts and deployment of smart contracts on Azure Blockchain networks, public networks like Ethereum or even locally deploying the smart contracts on Ganache.

Extending Your Application

After setting your Blockchain network and modelling the smart contracts you need an additional layer to interact with these smart contracts and writing or reading data from the ledger. Azure Blockchain Our Workbench accelerates the development process by providing support for extending your Blockchain application. It also provides the flexibility to integrate your Blockchain application with the existing apps and databases that your business uses already.

In Part 1 of Azure Blockchain for Enterprise Blockchain solutions series, we had exercised Step 1 of this three-step approach and launched an Ethereum Proof-of-Authority (PoA) network on Azure. Now, in the second part of the series, we will further learn about writing and deploying a simple smart contract on the Ethereum PoA network that we had deployed in Part 1.

In this article we will look at the following two methods for deploying your smart contracts on Ethereum PoA network:

If you want to deploy the smart contract for learning and testing purposes, it’s preferred to go with the first method that is using Remix (a browser IDE for compiling, testing and deploying smart contracts). However, if you are developing a product with Azure Ethereum PoA, it is advisable to go with the second method as Truffle provides you with a fine structure for managing the different components of your Blockchain application. 

In this tutorial, we are going to explore both the methods with a very simple test smart contract deployment on Ethereum PoA. So let's get started with the fun part.

Method 1 of 2: Using Remix for deploying smart contracts to Azure Ethereum PoA

There are no prerequisites for this method except the Metamask extension that you must already have installed if you have followed the first part of this Azure Blockchain series. 

Step 1: Writing Smart Contract

Navigate to https://remix.ethereum.org and click on the (+) button at the top left to add a new smart contract. Name the smart contract as “news.sol”. Now copy the following smart contract in your “news.sol” file:

[code language="javascript"]

pragma solidity >=0.4.0 <=0.6.0;
contract News{
struct newsFeed{
address publisher;
string newsDesc;
}
mapping(uint => newsFeed) public newsFeeds;
uint public newsCount;

function addNews(string memory _newsDesc) public {
newsCount++;
newsFeeds[newsCount].publisher = msg.sender;
newsFeeds[newsCount].newsDesc = _newsdesc;

}
}
[/code]

This is a very simple contract I have written for testing purposes. The mapping in solidity is like an associative array that maps the integer index with newsfeed structure here. Every time you add a piece of new news that is a simple string, the newscount is incremented, that is used as an index to access and store data in the newsfeed structure. Msg.sender in solidity denotes the Ethereum address of the caller of the contract.

So now as you have written your smart contract, navigate to the solidity compiler in the left pane in Remix and compile your contract.

Your smart contract will hopefully compile without any errors if you’re not at bad luck today.

Step 2: Deploying smart contract on Ethereum PoA

As your smart contract has compiled successfully it is ready to get deployed on the network that in our case is Ethereum Proof-of-Authority Network on Azure. Now in part 1 of this series after deploying the Ethereum PoA we got the deployment outputs containing the field like Ethereum RPC, admin site etc. So now we are going to use the deployment outputs here to deploy our smart contract on the network.

In your Azure Portal navigate to ResourceGroup→ Deployments→ Microsoft-azure-blockchain…→ Outputs and copy the Ethereum RPC endpoint to your keyboard.

Azure Portal navigate to ResourceGroup

RPC in the Blockchain is a data exchange protocol that allows for communication between your browser and your Blockchain network or node.

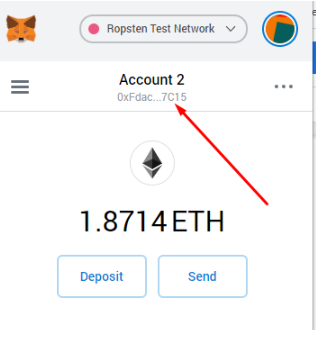
Now let's add this Ethereum RPC endpoint in Metamask so we can deploy the smart contract to Ethereum PoA network from Remix. Open Metamask extension in the browser and navigate to Settings→ Networks→ Add Network and paste the RPC endpoint you just copied into New RPC URL field. Adding into this field will connect your Metamask to Ethereum PoA network.

Once your Ethereum PoA network is connected, navigate to the “Deploy & run transactions” pane in Remix and click on Deploy.

Deploy and run transactions

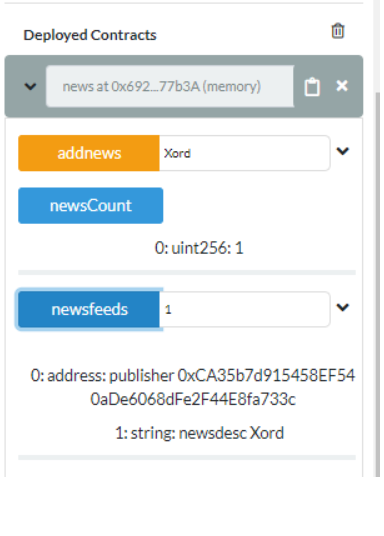
This will successfully deploy your smart contract on your Ethereum PoA network. You can now view your contract in the Deployed Contracts section of remix and can interact with it by adding into the fields.

Deployed contracts section

Method 2 of step 2: Using Truffle and HD Wallet Provider

In this method, you are going to use truffle for deploying your contracts. You need the following prerequisites for this method:

  1. Truffle Suite: Client-based Ethereum development environment
  2. Any code editor of your choice. However, if you are working with Azure Blockchain I would suggest you go with VS code as it allows you to interact with your network using Azure Blockchain Development that comes handy.

So now let's deploy our smart contract on Ethereum PoA using Truffle step-by-step.

Step 1: Create a Truffle Project

Run your command prompt as an administrator, navigate to the folder in which you want to create the truffle project and type the following command:

Truffle init

This will set a project layout for you in the selected folder like below:

Folder selection
Folder selection

Now let's add our smart contract in the contracts folder. You can use the same smart contract here that we have used in method 1.

Step 2: Adding Migrations

Navigate to the migration folder of your smart contract and create a new file named “2_deploy_contracts.js” for the “news.sol” contract. Paste the following code in this newly created file.

[code language="javascript"]
var news = artifacts.require("News");

module.exports = function(deployer)
{
deployer.deploy(news);
};

[/code]

Step 3: Adding your network settings

Now we are going to do the real work of deploying our smart contract on Ethereum PoA on Azure using Truffle.

Truffle gives you a “truffle-config.js” file to add your network settings. We are going to modify this file to add our Ethereum PoA network settings. For that purpose paste the following code in your “truffle-config.js” file:

[code language="javascript"]
const HDWalletProvider = require("@truffle/hdwallet-provider");
const rpc_endpoint = "Your RPC endpoint of ethereum PoA";
const mnemonic = "Your unique seed phrase";

module.exports = {
networks: {
development: {
host: "localhost",
port: 8545,
network_id: "*" // Match any network id
},
poa: {
provider: function() {
return new HDWalletProvider(mnemonic, rpc_endpoint)
},
network_id: 10101010,
gasPrice : 0
}
}
};

[/code]

In const rpc_endpoint add your PoA network endpoint and in mnemonic add you unique Metamask account phrase. You can find that in Metamask → Security & Privacy → Reveal seed phrase.

Truffle HD wallet provider: For privacy reasons, truffle provides you with HD wallet provider that signs your transactions for you using your private key rather giving access of your private key to any third-party.

Since we are using truffle HD wallet provider in our project, you can install the HD wallet in your project with the following command:

npm install @truffle/hdwallet-provider

Step 4: Deploying your Smart Contract

Now in your command prompt add the following command:
truffle migrate --network poa
This will start your deployment to your Ethereum PoA network on Azure.

Deploying your smart contract

However, you must use truffle version 5.0.5 to deploy your smart contract on Ethereum PoA. The latest version of truffle points some gas-related errors with Azure deployments. You can downgrade your truffle version with the following command:

npm i -g [email protected]

Step 5: Sending transaction to your network

As now you have deployed your smart contract to the Ethereum PoA network lets send a transaction to our network. In your project folder create another file with the name “sendtransaction.js” and paste the following code in that file:

[code language="javascript"]
var news = artifacts.require("news");
module.exports = function(done) {
console.log("Getting the deployed version of the news smart contract")

news.deployed().then(function(instance) {

console.log("Calling add news function for contract ", instance.address);

return instance.addnews("Hello, Xord!");

}).then(function(result) {

console.log("Transaction hash: ", result.tx);
console.log("Request complete");

done();

}).catch(function(e) {

console.log(e);

done();

});

};
[/code]

Now execute this script with the following command in the command prompt:

Deployment on the Ethereum Proof of Authority network on Azure

truffle exec sendtransaction.js --network poa
And Hurrah! Your smart contract is successfully deployed on the Ethereum Proof of Authority network on Azure!

That’s all for the part 2 of this Azure Blockchain for Enterprise Blockchain Solutions series. In this part, we have practised the second step of the Azure Blockchain 3 Step approach for building Blockchain applications. In the third and final part of the series, we will learn about building and modelling Blockchain applications with Azure Blockchain Our Workbench. Happy Chaining till then!

Find more articles on Blockchain on our blog https://blockapexlabs.com/publications/ or contact Xord @https://https://blockapexlabs.com/contact/ for Blockchain projects and free consultation.